
The jacket really has been the trickiest part of this whole project. Originally I'd planned on refashioning a women's large burgundy wool suit jacket into a tailored 1890's jacket. This plan meant I had to choose a design for my jacket that wouldn't be a fabric hog. So no ginormous sleeves from the middle of the decade. Oh no, my fabric source required dainty? restrained? flat? straight? less awesome? sleeves.
 |
| Click on picture to go to original Flickr photo |
As I looked at 1890's fashion plates, extant garments, and photographs it became obvious that I would be making a jacket from 1897-1899, the very tail end of the Victorian era. In 1897 the puffed sleeves collapsed, leading to a more restrained arm silhouette which I believed I would be able to achieve using just the fabric from the jacket in my stash. After a bit more looking I fell in love with the scalloped jacket from 1898 in the above fashion plate. (Which I found on Pinterest, linked back to Flickr and have been unable to find anywhere else, so I am unsure of the exact origin.). I now knew exactly what I wanted my 1890's jacket to look like so I could begin making it! Once I assembled the correct materials and patterns of course.
 |
| Another scalloped jacket design, also from 1898. Found in Victorian Fashions and Costumes From Harper's Bazar 1867 - 1898 From Dover Publishing. |
With my design figured out I decided to throw the musty burgundy wool jacket in the washing machine for a little freshening up. Yes, I know you're not supposed to machine wash wool, but I've actually had good results with it in the past. My standard treatment with wools is to machine wash, preferably on "gentle" or "delicate", then hang to dry. I've had no problems with this cleaning method - providing I don't throw the wool in the dryer! Well, yep, that's exactly what happened with the burgundy jacket after washing. It accidentally got tumble dried and shrunken beyond usability for this particular project. Darn it all. The project got put off until different material could be acquired.

A few weeks later my wonderful mother bought a length of burgundy wool online and gave it to me for my 1890's jacket plans. The 1898 scalloped jacket plans were back on! I didn't have time just then to begin making the jacket, but I kept it in the back of my mind and mulled over how I might construct the thing.

I decided the scallops would look best if they were piped, and matching burgundy silk piping would be amazing. So, I attempted to dye a scrap of silk burgundy, and instead wound up with a piece of bright purple silk (seen two pictures ago). Not exactly what I was going for. Next I ordered a piece of "dark red" silk online. It came and was much too bright. So I used it to trim my red wool dress instead. I attempted to dye another scrap of silk (seen in the above picture). It came out closer to the right color than my previous attempts, but still much too bright and not usable. At this point I was close to despair. would I be able to make this jacket at all?? I was failing at acquiring a bit of burgundy silk to pipe it with!

Then I recalled a basket of neck ties sitting on a shelf in my sewing room - given to me once upon a time by someone who'd been clearing out their sewing room. It hit me that ties are often silk, and they're cut on the bias so one could easily be turned into piping. I looked through the basket, and there it was - a burgundy tie. I checked the tag, was it silk or polyester? It was silk!! I had my piping material!! After three failed attempts at acquiring the right color silk it turned out I'd had it in my sewing room the whole time!

I disassembled the tie and cut it into strips to turn into piping. My main materials for the jacket were gathered. Any other sundry materials I might need to complete the project I was confident I'd be able to find in my stash, or atleast at Joann's. I just needed to figure out a pattern to use and serious jacket making could begin!

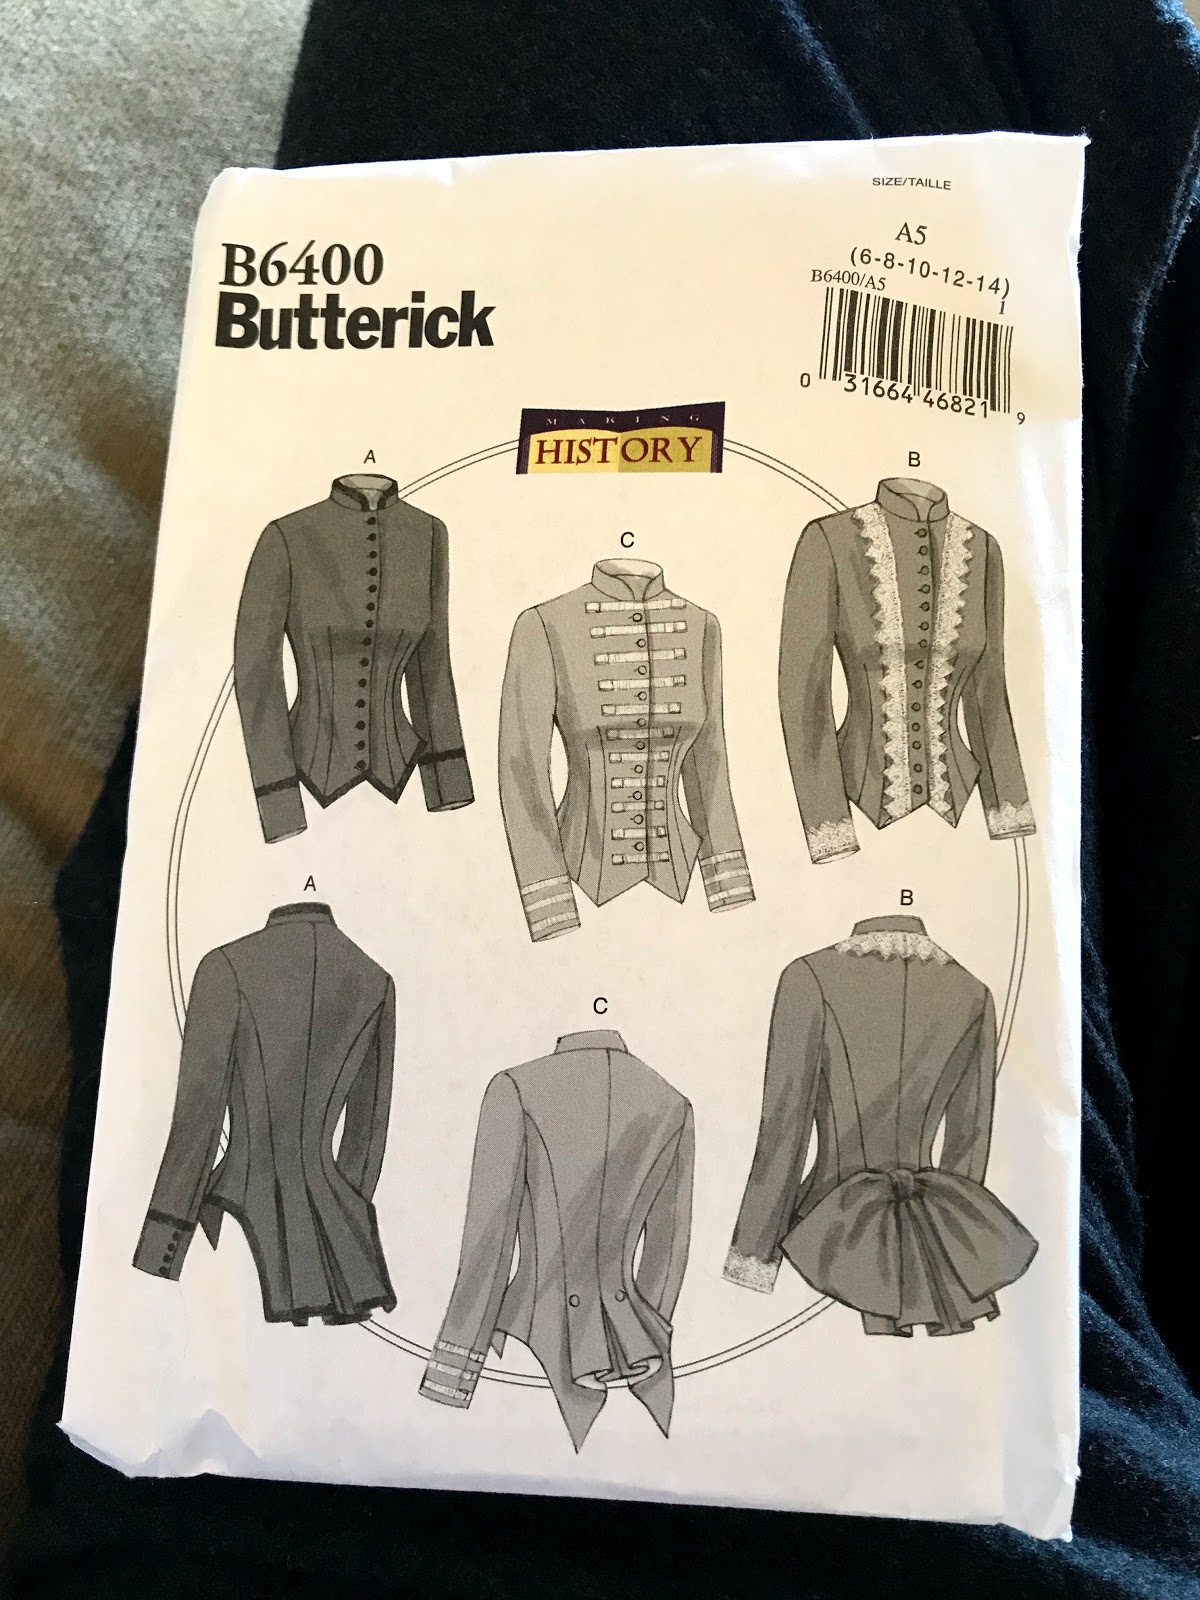
After considering several different pattern options over the course of the past year (including, but not limited to, McCalls M7732, the Wearing History Sophie Jacket, and this one from the Vintage Pattern Lending Library), I finally settled on Butterick B6400. No matter what pattern I started with I would have to make alterations to match the fashion plate jacket I wanted to recreate. I decided on the Butterick pattern because it had the correct seam lines and back pleats, making it the perfect starting point.
Before cutting into any of my hard-won materials, I perfected the pattern by making a mock-up. I evened out the back pleats so they matched the length of the rest of the jacket and cut the front panels so they would have lamples.

I cut the upper sleeves wider at the cap so they would be slightly puffed rather than straight all the way down

I basted together the mock-up and tried it on over my corset, corset cover, and shirt waist.

I straightened out the front hem, leveled out the back pleats a little more, noted that the lamples needed to start a bit higher up, narrowed the front panels, shortened the collar, and adjust the shoulders to fit me a bit better. Then I attacked the sleeves.
 |
| My second attempt at a sleeve mock-up. |
My first attempt at sleeves was disappointing to say the least. They lacked body. I decided the sleeves needed to start a bit higher up on my shoulder and they needed more poof! I made some adjustments and tried again.
 |
| The final sleeve mock-up |
After 3 or 4 tries I had a sleeve I was satisfied with - just the right amount of poof at the shoulder and nicely fitted through the forearm.
 |
| The Butterick sleeve pattern laid over my final sleeve pattern |
My final sleeve pattern had more shape to it than the original pattern. More height and width were added to the sleeve cap while the rest of the sleeve was slimmed down and slightly curved.
Once my mock-up fit me correctly and had the right basic shape, I disassembled my mock-up and transferred the pattern to paper. Now it was time to address the most eye-catching feature of the jacket - the scalloped edges!

I decided that rather than adding the scallops to the pattern itself, I'd leave the pattern edges smooth and make scalloped facings. Once the facings were sewn to the jacket the edges could be cut to match the facings and all would be good - scalloped to perfection! So the first thing I did was draft facings - a front facing, a back facing, and a sleeve hem facing.

Once all the facing patterns were made, I cut a strip of paper the same length as the front of the jacket front opening. This would be my scallop template. I folded it into nine even sections, cut it into scallops, and unfolded it. I laid the template over the front facing pattern piece and traced the scallops onto the front opening.

Then I used the scallop template to trace scallops along the bottom edge of the front facing and across the bottom of the back facing. I slightly adjusted the size and shape of the scallops as I went along so they curved with the hem and would meet up nicely at the side seams.

When that was done, I made the sleeve scallops. I divided the sleeve hem facing into eight sections, each about 1" wide. (I'd wanted to do nine scallops to match the nine down the front opening, but that would have made the scallops too narrow to nicely pipe, so eight it was.) I made sure not to extend the scallops into the seam allowance. Then I took another piece of paper the same dimensions as the facing and cut it into eight strips, corresponding with the width of the scallops and all hinged together at the top. This was the start of a scalloped sleeve flounce pattern.

To make the flounce pattern, I curved the piece of paper cut into strips into a half circle and taped it to a larger piece of paper. The inner edge of this half circle was the same length as the bottom of the sleeve. The outer edge, thanks to the way I'd cut the strips, was divided into eight even sections which perfectly corresponded with the eight scallops on the sleeve hem facing.

I cut a scallop around the end of each strip of paper, and there I had it - my scalloped hem flounce pattern. The final pattern piece I needed for my 1898 scalloped jacket!
 |
| umm, yes, I did use previously used wrapping paper to make my pattern. . . |
Haha! It's being resourceful right? I've started drafting patterns on the used theory sheets my piano students turn in (after I checked it of coarse).
ReplyDeleteLove those pipped scallops! And can't wait to see your finished ensemble. It will be well worth your waiting and agony; )
Pattern making is such a great way to use up scrap paper! Thanks!
Delete