Saturday, June 29, 2019

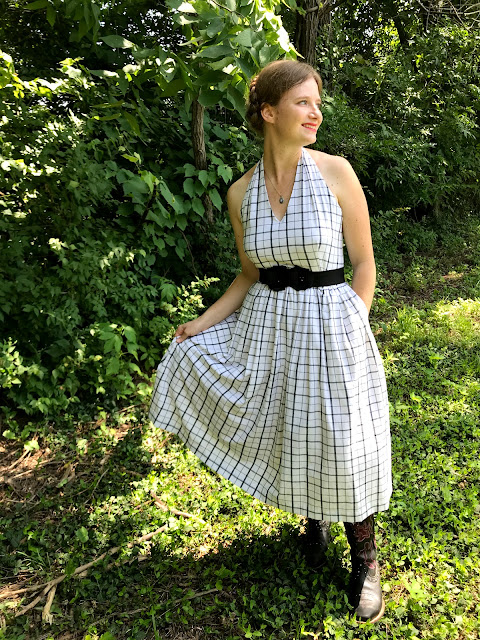
The "Made Like Maisel" Rose City Halter Dress

While scrolling through Instagram about a month ago, I happened upon a sewing challenge I immediately got excited about. The "Made like Maisel"challenge, hosted by Mini Maedel Creates, is all about making an outfit inspired by the Amazon show "Marvelous Mrs. Maisel", which is set in 1950's New York City.


Now I started to watch this show a while back, and never really got into it. So I stopped watching it about 5 episodes in. That said, I loved the costumes in those 5 episodes. And I might go back to watching the show some time just because the costumes are, well, marvelous. I do love 50's style clothes!


Somewhere in the 5 episodes I did watch, I saw a dress I just had to make. Actually, I wanted to make all of them, but for this one I already had both a suitable fabric, and a suitable pattern, sitting in my stash.


There is very little that could be found on the internet about this dress that caught my eye, as it appears to only have shown up in one scene of the show (I guess). Thus, unfortunately, all I have to show for my time tracking down the inspiration dress is a few very grainy pictures. That said, with out further ado, here's the dress I've been wanting to (loosely) recreate for months now, which the "Made Like Maisel" sewing challenge has inspired me to finally make (before the July 5 deadline) rather than only dreaming of.


Despite the horrid quality of this picture I scrounged up, you can still see the basics of the design. It's a purple plaid halter dress with a very full skirt. What really caught my eye is the amount of movement and swish that gathered skirt has when you actually see it in motion on screen. It's marvelous. 


Immediately, this plaid beauty brought to mind a 3 yard length of the softest, floaty-est, white and black plaid linen I happened to have in my stash. No, white and black isn't quite the purple shown in the show, but the plaid had the same feel to it. This once upon a time thrift store acquired fabric was begging to be turned into a Mrs. Maisel inspired halter dress.


The pattern which immediately sprung to mind for this plaid halter dress project was the Rose City Halter Dress by Sew House 7, already in my collection. I received this pattern, free of charge, last summer in exchange for testing the Sew House 7 Montavilla Dress (formerly known as the Montavilla MuuMuu) The Mrs. Maisel dress had a modest v in the front, and a surprisingly high (for a halter dress atleast) back. The Rose City Halter pattern too exhibited these features. Thus, the choice was a no-brainier.


This fabric and pattern pairing, and the inspiration for it, has been in the back of my mind since some time over the winter, or even possibly last fall. Finally, last week, thanks to the encouragement of the "Made Like Maisel" challenge and the looming July 5 deadline for that event, I made my full-skirted halter dress.


 Now in my tracking down of the inspiration dress on the internet, I discovered Mrs. Maisel's dress was patterned a bit differently than the Rose City Halter. The bodice of the inspiration dress is fitted with tucks and gathers, rather than darts, and the back of the skirt is a partial circle to allow for extra fullness and movement at the hem. I considered majorly altering the pattern to reflect the cut of Mrs. Maisel's dress, but the reality was I did not have enough fabric for that endeavor.


I had 3 yards of 44" wide plaid linen to make my dress from. Full-skirted 1950's dresses use a lot of fabric, and 3 yards is the bare minimum amount of fabric required. This is just enough fabric for a straight-cut full gathered skirt and a sleeveless bodice. To make the gathered top and partial circle skirt of Mrs. Maisel's dress, I would have needed 4 or 5 yards of fabric to play with, which I just didn't have. Thus, I decided to make the bodice of the Rose City halter dress exactly as the pattern was designed.


The front bodice is fitted with two waist darts. Hidden in the straps are some deep tucks, which contribute toward an excellent fit. 


The very first thing the pattern instructions tell you to do is stay-stitch your neckline so it doesn't get stretched out, being cut on the bias and all. I was lazy and skipped this step. That was a mistake. My neckline is now slightly stretched out. Thankfully, not too horribly. But still, next time I make this bodice I will definitely be stay stitching as I should have done this time.


The back of the dress is cut on the straight-of-grain, as the pattern dictates, and comes up just high enough you can easily wear a bra underneath.


I didn't use any pattern for the skirt. It's simply two full 44" widths of fabric, cut as long as I wanted, and gathered to fit the bodice.


Each side seam features a very large pocket, which is anchored at the waist seam so as not to drag down the skirt seam.


The dress looks marvelously 50's-ish worn over the net crinoline I made several years ago. And I think it pairs well with my black boots - even though cowboy boots are distinctly not Mrs. Maisel-ish.


I love this dress. Being made from linen, it is very cool and comfortable to wear on hot summer days.


And, even though I'm not really into the show, dressing like Mrs. Maisel is marvelously fun!


Friday, June 28, 2019

Kittens and the Phoebe Pinny

The best garments have pockets large enough to carry kittens in.


With the birth of  a litter of kittens in our hay loft several weeks ago, and the subsequent loving on kittens which was required once the kittens were older and ready to play, my sister discovered she had just such a garment in her closet.


The overall dress I made my sister this spring, features the most wonderfully large front bib pocket. The perfect place to carry a kitten as one goes about her daily chores!


The pattern I used for this lovely kitten-carting garment is the Phoebe Pinny, by Pattern Union. This is the dress version of the Phoebe Bib&Tucker pattern, which I tested back in March.


A week or two after the overall pattern testing wrapped up, the pattern designer emailed me to see if I'd like to test the dress version of the design as well. My sister seemed willing to have a dress version of the pattern made for her, so I quickly agreed. As my sister had already requested her next pair of overalls be green, I applied that request to this dress, and picked out a green heavy cotton, with a gold leaf print, from my stash.


When it came time to make the dress, there was only one slight stylistic issue - the skirt portion of the pattern was relatively straight, and my sister and I tend to avoid straight-ish skirts. You just can't move in them the way you can move in full skirts. When we wear skirts, we like to be able to be just as active as we are in pants - so full (ish) skirts all the way!!


With this in mind, I asked the designer if I could hack the skirt portion of the pattern to be a little fuller, featuring center front and back box pleats. She loved the idea, as she likes for her patterns to be "hack friendly" and that is reflective in her testing process. The more you can hack a pattern, the more it will be used! Thus, along with making the skirt a little extra full, I also cut the length half way in between the two skirt lengths included in the patter - above knee, and midi length. My sister's dress is just below knee length.


To accommodate the box pleat idea, I added an extra 5" (or so) to the center edge of both the front and back skirt pieces.


The center seams were then sewn up like normal, and the excess fabric was pleated at the waist before the skirt was sewn to the bodice.


This worked like a dream, and the pleats turned out exactly as I'd envisioned! I think the box pleats suit the overall-style dress very well.


For a little extra shaping, this pattern has side ties to cinch the dress in a bit at the waist. This detail was thought up by one of the Phoebe Bib&Tucker testers, and I love the way the designer applied it to the dress!


Not only do these ties add nice shaping, they also make the fit very adjustable - always a good thing.


The shoulder straps fasten with gold buttons on the front bib - my sister's choice, which I think matches the goldish-tan leaves and top stitching on this dress beautifully.


Just like with the Phoebe Bib&Tucker, the bust darts on the bib give a beautiful fit to this dress - and the pattern includes different front bib pattern pieces for different cup sizes! Patterns that include cup options are my favorite!


Testing this pattern was enjoyable, and seeing my sister wear the dress regularly in the months since completion has been even better!


I had no idea I was making a kitten-carrying dress when I made it, but the front bib pocket is perfect for that purpose! My sister just can't carry more than one kitten in her pocket at a time, otherwise the mama cat gets a little nervous.


Our little Licorice is proving to be a wonderful, attentive, mama. Willing to share her babies with us as long as we don't borrow too many at one time!


Aren't these babies the cutest things?!?!


Wednesday, June 26, 2019

The "Dressmaker's Companion" Found in Japan

I went fabric shopping in Japan. Of course I did. No surprise there. I'm even now a card carrying member of a Japanese fabric store, because becoming a member saved me some money on all the fabric I was buying. . . .


That said, fabric was not the only sewing related item I brought home with me. In in pile, in the back of a rather jumbled recycle shop, I found this box.


It was sitting wide open, and the contents caught my eye.


Button hole chisels!! Immediately I knew what those paper wrapped things were! I've been wanting button hole chisels (I'm not entirely sure that's the correct term, if you know better, please advise) for the past year, ever since I saw a video on Instagram of someone opening button holes with one.


There are two button hole chisels/openers in this set. One about 1/2" wide, and one about 1/4" wide.


Along with the chisels, I found two other equally useful wooden-handled sewing tools in the box.


A leather punch.


And a nice, pointy, awl. You can tell this has been the most used of all the tools - and its usefulness is not over yet!


Accompanying the wooden-handled tools is a thimble-ring-thing.


And a measuring tape, with inches on one side. . .


And centimeters on the other.


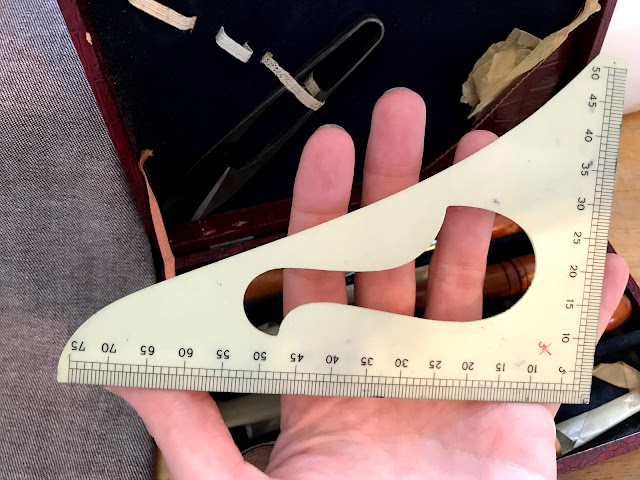
In the top of the box, I found these rulers.


I'm not entirely sure what they are used for, but they're small. . .


And very interesting shapes! Almost like miniature pattern drafting rulers.


If anyone knows anything else about these things, please let me know!


I immediately recognized the final item I discovered in the box.


Thread snips! I've been using these regularly at my sewing machine ever since I returned home last week.


I found an excuse to try out the larger button hole chisel when I made myself a new pair of shorts over the weekend. I'm not sure my dad will be getting his small rubber mallet back any time soon, as it works perfectly with the chisels!


Now I just need to find a project which will allow me to use the awl! Maybe this little box is just the excuse I need to finally make the corsets I've been planning for months! The awl will be very useful next time I need to set a bunch of grommets!


As fun as new fabric is, this  little box, labeled "Dressmaker's Companion" is definitely the most exciting sewing-related item that came home with me from Japan!