Wednesday, September 16, 2015

The Colorful, Lacy, Shirty, Dress

I have a specific sewing goal for this month, buy no fabric. I already have quite a stash. So the plan is to just use material from I already have, all month. One of the first things from my stash to use up? The 5 men's shirts I got to use for The Refashioners 2015. Last week I started off by making my little sister a dress from a very large grey/silver shirt. This week it was my turn. I started out with this XL shirt,


Intending to make it into this dress.


I thought I might need 2 shirts to make this dress, so I was pleasantly surprised to discover that I had enough fabric in just one shirt!
First I cut the button placket off most of the shirt, just leaving it attached along the top few inches. Then I chopped off the bottom of the shirt, about mid arm hole, and put what was left on my dress form.


My plan was to make the bodice similar to this shirt I have.


So first I cut out a yoke. Then used the shirt sleeves to drape the bodice front.


Now I don't drape things. I'm pretty attached to using patterns as the starting point for whatever I make. So this was really out of my comfort zone!
I draped the upper bodice front, then cut the back out using a pattern. For the lower bodice front I had a plan that didn't involve patterns or draping.


The cuffs and collar stand were lined with this bright print. I thought it would be fun to showcase that print somewhere on the dress. So I used the cuffs, inside out, as the lower bodice front. I sewed the inside of the collar stand across the back of the dress, giving the illusion of a brightly colored belt around the dress.


The bodice went together easily, then it was time for the sleeves. Those sleeves took more time than everything else put together. I had some blue lace I wanted to uses for the sleeves. So I sewed the strips of lace together, cut out the sleeves, and sewed them on. Then I tried on the dress. The sleeves just weren't going to work. Why? for several reasons, but the first one I tackled was the shoulders. The dress was too narrow in the shoulders for me. So, I removed the sleeves and got to work. I took apart the collar and used it to extend the shoulders.


On the front I folded the bottom of the collar to get it to lay flat against the bodice the way it needed to.


On the back I just trimmed  the excess fabric off. This didn't work well. It left me with weirdly puckering, baggy, back shoulders once the sleeves were sewn on, so I had to make a tuck about halfway up the arm hole.


It's not pretty, but atleast it got the bodice to fit right in the shoulders.
Once I had the arm holes all fixed up, it was time to figure out the sleeves. I started with straight, almost half-length, sleeves , like in my sketch. Those didn't work for me. They were too tight and allowed very little movement. So, I tried little cap sleeves instead. I still couldn't raise my arms. Next I tried slightly puffed cap sleeves, the fit was better, but I wasn't sold on the look. At this point I was seriously considering just leaving off the sleeves all together, but I had already cut up my lace to make these sleeves. So, by golly, I was going to have lace sleeves on this dress! Finally, after a lot of sewing, seam ripping, pinning, re-sewing, re-seam ripping, and re- pinning, I came up with 2 possible sleeves variations, that were both comfortable and relatively cute.


Flutter sleeves and puffed cap sleeves. Well, I decided the flutter sleeves were the most comfortable and most flattering, so that's what I went with.


I took apart the puffed sleeve, and re-made it as a flutter sleeve. Oh, and did I mention, every sleeve variation I attempted (atleast 5), was made using to original straight lace sleeves? I took appart and re-sewed those lace stripes together more times than I care to remember. But in the end it was worth it, I had cute sleeves and even had enough lace left over to add some to the skirt hem.   


Now, the skirt. I made it from the bottom of the skirt.. Remember how I had cut it off mid arm hole, rather than below the arm hole? Well, I had a reason for this. The bottom half of the arm holes was perfect for pocket openings. I hemmed the edge, and then used what ever fabric was left from the original skirt to make pockets.


I sewed them on like patch pockets, only on the inside rather than the outside. 


Once the pockets were in, I pleated the skirt onto the bodice. I re-attached the button placket to the skirt.I had to add an extra piece of fabric (the original shirt pocket) at the bottom since the button placket wasn't quite long enough.
  

I bound the neckline and arm holes with some bias tape I had on hand. Last minute I decided to add some lace to the bodice, this blue crocheted lace that I had one small scrap of, less then a foot. It doesn't match the other blue lace, but I think the bright colored waist band ties everything together.


I'm very happy with my lacy, colorful, shirt dress. This project really challenged me between the draping and the sleeves, but it came out better than I'd hoped.


The goats certainly seemed to like it!


Another challenge in this dress? Inspired by the flat felled seams in the original shirt, I made this dress with a mixture of french and felled seams, so the inside looks professionally finished. While finishing seams may not be the most advanced of sewing skills, it's something I very rarely take the time to do in my modern sewing. At best I pink, or occasionally zig-zag stitch, my seams. So a garment with completely finished seams is quite an accomplishment for me! Hopefully I'll take the time to do the same on future projects.


This is a dress I'm proud of, now onto the next shirt it the pile. I'm not sure I can beat this dress, but I'll try!


Friday, September 11, 2015

The Gold Corset

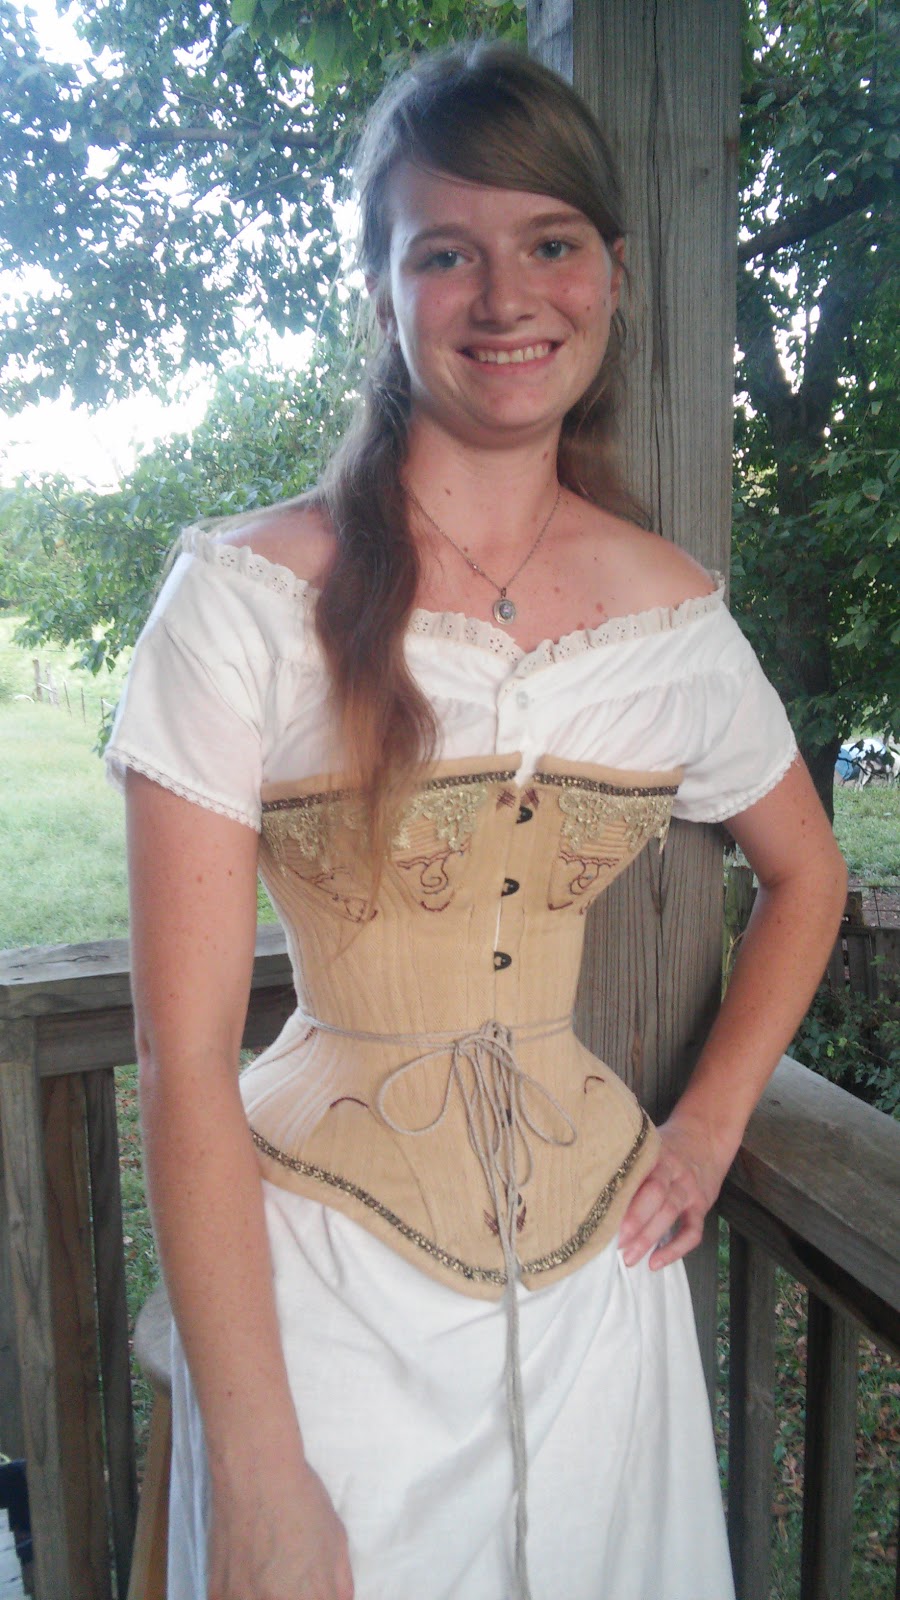
My pink corset. I love it, it was the first truly historical article of clothing I made. With a few alterations, I got it to fit me like a glove. However, it's not without a few issues. The biggest one? Well, technically it's too big for me. 


When all laced up in a Victorian corset there is supposed to be about a 2 inch gap in the back. When I'm all laced into my pink corset there is no gap. With this in mind I have been thinking of making my self a new corset for a while now. I even bought the pattern I wanted to use, simplicity 2890. I just haven't had a really good reason to make myself a new corset. Well, finally I came up with a reason. I needed a gold corset for my Zelda costume.
Now I could have just made a costume corset for this, rather than a real one, but I figured if I was going to spend the time and money making a corset I ought to make one I'd get plenty of wear out of. So I decided to make a real, gold-colored, historical corset.
The first thing to do? Finding a gold colored fabric made of natural fibers, so not polyester. This proved to be a challenge. I spend over an hour in Joann's and found nothing! So I decided to go to Kohls to see if there were any gold cotton pillowcases in my price range. Well, I hit the jackpot! In the clearance section I found this gold cotton pillow sham, and it was 90% off!


So I bought it, went back to joanns to get some gold trim to go with it, then got to work.
Now the first step to making a corset is the most vital, yet also the hardest and most boring part of the whole process, making and fitting a mock up. I made my mock up from old jean legs (left over from making cut-offs), used a zipper in the front instead of a busk, put in some plastic boning that I had on hand, and added eyelets down the back. After making (approximately) 2.7 mock ups of the front, and around 6.9 of the back I finally had a perfectly fitted corset!


I did learn a few things throughout this process, first it's a really, really good thing I actually made a mock-up rather than immediately cutting into my gold fabric. If I hadn't made the mock-ups I would have had a very ill-fitting corset in the end. Next, I discovered why you should never ever use plastic boning in a corset. The plastic boning I used in the mock-ups wound up very warped by the time I was done with it. Finally, the smartest thing I did on the first mock-up was put in eyelets, then cut the strip of eyelets off and sew them onto each following mock-up. By doing this I saved a lot of time!


Once all the fitting issues were worked out it was on to the fun part, making the real thing!
I traced my lengthened, let out, taken in, and reshaped pattern pieces onto construction paper. (I actually used a different pattern entirely for the corset back, as I just couldn't get the back of my pattern to work for me.) Then finally I got to cut into my soft, lovely, gold cotton. 


This corset pattern is for a single layer corset, but I chose to make it double layer instead as my gold fabric wasn't stiff enough and had to much "give" in it to work as a single layer corset. So, I chose to line it with a sturdy cotton twill.
There are several different ways to make a double layer corset, and no one way is perfect, so I picked the one that made the most sense to me. I assembled the two layers separately, but didn't put the bust and hip gussets in. Then I sewed the two layers together at the front and back. Finally, I put the gussets in by sandwiching them between the two layers and top stitching them in place.


Around the gusset ends I used the buttonhole stitch to strengthen the fabric.


The gussets are my favorite part of this corset, I got rather creative with them. The pattern I used was a copy of a pattern from 1867, but when it comes to decorations my corset more resembles those from the 1870-80's, especially the gussets.

An original corset from the 1870's or 80's

Looking through pictures of original corsets for decoration inspiration I was really drawn in by the corded and embroidered gussets of this era, so I decided to attempt both. I was pretty confidant of my ability to cord the gussets (to make them stronger), but I knew nothing of embroidery.

The zipper foot, what a wonderful invention. It was very helpful for cording the gussets.

Well, the embroidery didn't turn out perfect, but I like what it adds to the corset. (though if I ever decide to attempt embroidering something again I will definitely do more research first!)


Once the embroidery was done and the gussets sewn in place it was time to bone the corset. I used spiral steel bones, as I have about a 25 yard roll of spiral steel boning on hand. Since this is a double layer corset making the boning channels was easy. I just stitched the 2 layers together where I wanted the bones to go then inserted the boning between the 2 layers.


Then it was onto the binding, and I discovered the best part of using a pillow sham for this corset.
The edges of the pillow sham had been bound with gold twill tape. I saved this when I took the sham apart. Well, that twill tape worked perfect as corset binding, so I didn't have to make any bias binding! I sewed on the binding and gold trim. 


Then, I couldn't help but add this lace for an extra splash of gold. I'm not going to claim the gold lace is historically accurate, but it was the perfect accent to my Zelda costume!


In hopes of this corset lasting a while I flossed around the ends of the busk and plan to do the same on each bone when I get the time. Flossing keeps the bone ends from wearing through the fabric.

Once the corset was done, I wore it all day as part of my Zelda costume for the Japanese Festival. It was actually pretty comfortable (though I did have to loosen it once toward the end of the day). I am so glad I made the coset out of cotton, a synthetic fabric would have been horrendous in that heat!


Now, does this corset fit better than my pink one?


Not exactly. This one is actually a bit small in the waist (but perfect in the bust and hips at least!). When all laced up the gap in the back should be even all the way down, mine is a bit bigger in the middle. Now I could lace it tighter to try to get the gap even, but that would be uncomfortable. Also, laced this way I have the same measurements as I do in my other corset, meaning my historical clothing will fit over it perfectly. Any tighter and my dresses would be too big! I worked too hard on them for that. Maybe eventually I'll succeed in making a perfect corset, but for now 2 corsets is plenty.


Due to all the other sewing I had to get done in August, this is the only historical sewing I got done. The Historical Sew Monthly challenge was heritage and heirlooms, and while not perfect for the challenge I'm using this corset as my entry. 


What the item is: A gold corset

The Challenge: #8 Heirlooms and Heritage.  
Though not what had I hoped to make for this challenge, I feel it fits in two different ways. First, well, my female ancestors did wear corsets, and they had immigrated to America by the mid 1800's (when the corset is from) so it's very possible one may have had a similar corset. Second, while I don't really think this is going to become a family heirloom, I did attempt embroidery on it, (something I've never done before) which I consider an heirloom sewing skill. Also I flossed the busk and intend to floss the rest of the corset when I get the time so that it will last longer. 

Fabric: A gold cotton pillowcase, lined with ivory cotton twill

Pattern: Simplicity 2890, with alterations

Year: The pattern is taken from a corset from 1867, but I made the corset to resemble those from the 1870's

Notions: spiral steel boning, steel busk, metal eyelets, linen lacing, cotton cording,all-purpose thread, upholstery thread, gold trim and lace 

How historically accurate is it? The fabric is accurate, the notions not so much. A mixture of hand and machine sewing. The look is right, except for possibly the gold lace. So about 70%?

Hours to complete: Not really sure, I worked on it on and off all August.

First worn: September 5th

Total cost: about $30


Thursday, September 10, 2015

The shirty dress

Take a men's shirt. Turn it into something else. That is the challenge I happened across while browsing sewing blogs one day. Once I read all the details I knew I wanted to participate. So I sketched out a couple design ideas, then went to the thrift store to get my shirt. I came home with 5, yes 5, not the one or two I had planned. Well, since I wound up with 5 shirts, I was going to refashion 5 shirts, starting with this 2XL grey/silver one.
 

This shirt was made out of the most soft gorgeous cotton. The wrong side of the fabric had the same design as the right side, just with opposite colors. I decided it would be perfect as a dress for my sister. Now, I could have just used the shirt as fabric for this dress, but I really wanted to retain some of the "shirty" elements in the dress.


I used a pattern, McCall's M7035, as my bodice base carefully laying out the pieces to highlight the elements of the shirt that I wanted to keep, such as the button placket. From the body of the shirt I managed to get both bodice pieces and the sleeves cut out. I cut off the bottom of the shirt to save for part of the skirt. The rest of the skirt I made from the sleeves.


First I removed the cuffs, as I had other plans for them, then I cut the sleeves in half.

I sewed the sleeve tops and bottoms together at the sides, making one big loop. This would be the skirt. I really liked how it mimicked the shape of the original shirt hem. Since I loved the wrong side of the fabric as much as the right, and wanted both to be seen in this dress, I alternated which side was up in the skirt panels.

The skirt wound up being a bit short at the sides, so I used the back yoke pieces to lengthen it.


Once that was done, and the bodice attached to the skirt, the dress was ready to wear!


It turned out very cute, and my sister loved it!


The layered skirt and faux belt across the front (made from the collar stand) are some of her favorite details.


I personally love the color blocking and the side front buttons.


The original shirt cuffs on the sleeves definitely add to the dress, too. 


I'm not sure Daffodil agrees though, or maybe she just isn't a fan of having her hunting interrupted. 

At the beginning of this post I mentioned a challenge this dress was part of. The blog Makery is hosting The Refashioners 2015. The theme is Get Shirty! The challenge runs through September 27th, and anyone can take part, so grab a shirt and Get Shirty with the rest of us!


Now, I have a few more shirts to get back to, along with some other projects I had to put off in order to get the Zelda costumes done. So check back soon to see what those are and hear what my specific sewing goal for the month is (it extends past refashioning 5 shirts). Until then, back to sewing and goats I go!


Monday, September 7, 2015

Sewing Madness (and the AWESOME results)

Every year it happens. We come up with an idea. We make it happen. We work hard till the wee hours of the morning. We drive there, while still finishing the last few items. Then we have a great time, while blowing everyone away with our amazing designing and sewing abilities. At the end of the day we swear it will be different next year, we will finish sewing days, if not weeks in advance. But every year it's about the same. Yep, that's how the Japanese Festival has gone for us, every year, for the past 5 years.


left to right, Erentry as Medli, T as Malon, Tori as Link, Myself as Princess Zelda, S as Dark Zelda, J as Dark Link

I have two amazing best friends, who are both obsessed with things from Japan, especially Anime. So every year they choose an Anime for us to cosplay from. I personally have no particular affinity for Japan and prefer my TV shows to be live acted, but I love my friends, love dressing up, and the Japanese Festival is lots of fun. So, what started out as "I'll do this because my friends want to," has turned into, "Yay! The Japanese Festival again!"

This year the chosen cosplay was Legend of Zelda, one of Tori's favorite video games, which originated in Japan. We decided to make our cosplay with a bit of a steampunk twist. After 5 years of doing this we have our costuming system down. Tori and Erentry decide what we will cosplay as. Erentry is our head designer, especially when it comes to accessories.

Painting the sleeves and fixing the neck kerchief just right for the Malon outfit 

 I'm the head seamstress. Tori helps out with whatever we ask her to do. Erentry's Mom helps out with sewing and making accessories. This year she did all the painting required on the costumes.

Sewing buttons on, one of those important things that always gets put off till the end.

We try to get the bulk of the costume work done in the weeks leading up to the festival. This year, however, due to crazy work schedules, we wound up sewing most of the costumes in the week leading up to it.

Due to the compressed time frame we even got Tori to use a sewing machine for the first time since 4-H! Now that she is sewing again I look forward to seeing what projects she comes up with in the future!

Surprisingly, despite the late start this year, by the night before we only had a few things left to finish. 

Erentry makes her Medli feet. She is a genius when it comes to making accessories! For these "feet" she dyed and painted 2 pairs of white socks, then used one of the pairs to cover a pair of flats with.

By 2 a.m. the night before, all the costumes were done and we were asleep! Last year, we started our costumes months before, but had to stay up till 4 a.m. the night before, then we still had to finish sewing some stuff in the car the next morning. So this year we were very impressed with ourselves! 

Once we get to the festival the fun begins. What started as Erentry, Tori, and Myself, has turned into us plus various friends and family. This year my family even came for the first time! Not wanting to be left out of the fun, My little sister chose to dress as a Pokemon, Vaporeon.

She used the ears, tail, and ruff from Erentry's costume last year. I made the blue dress the night before the Festival.

Throughout the course of the day we had multiple people stop us and ask for pictures, and we even participated in the Cosplay Fashion Show.


We all got packed into a little hallway waiting for the fashion show to begin.


While rather uncomfortable, it was fun to see how other people had made their costumes.


And it was certainly fun to show off our costumes!

We saw traditional Japanese things, watched a Sumo wrestling demonstration, and got to do Bon Odori dancing (traditional Japanese dancing to celebrate the end of summer). One of my favorite parts of the Japanese Festival each year though, is just wandering around the Botanical Gardens, where it's held. The gardens are beautiful, and hold so many surprises. 

My little sister runs through the maze

In the Victorian garden there is a hedge maze. Above the hedge maze is an observation tower. 


The kids broke into a random game of tag in the maze. It was great fun to watch from the tower, where we hollered instructions and encouragement.

"He's over there! To your left! No, that's a dead end!"


By the end of the day we were all exhausted, but it had been worth it! How many excuses do you get to dress up in awesome costumes with your best friends and wander through gorgeous gardens? Not to many, so I'll keep taking this one, sewing madness and all.