Monday, July 9, 2018

Happy Butterflies, Sword Fights, and 4th of July!

Every once in a while you need a skirt. A skirt with large pockets. A skirt that's comfortable. A skirt that you can run and play in. A skirt that you can sword fight with your brother in. Yes, every once in a while you need that kind of skirt. 


At least, that's the kind of skirt I decided my sister needed when I agreed to test the new child's Gingerbread Gretel skirt by Mother Grimm designs. This pattern is sized from newborn, to 14 years, and my sister's measurements just lined up with size 14. So, I decided why not? My sister could use some new skirts, the designer needed someone to test size 14, and I had a few pieces of knit fabric, too small for a full garment, but too big to be clasified as scraps, that I wanteded to use up. 

The pockets are almost large enough to stash a play sword in!

A few weeks ago, I was gifted a butterfly T-shirt to add to my fabric stash and re-fashion at my leisure.


Of course, as soon as this shirt came home with me, I knew it would become something for my sister, but what, I didn't know. Thankfully, before the shirt had time to languish in my fabric stash and be forgotten, the question was answered. I received the Gretel Skirt pattern for testing and the front skirt panel pattern piece just barely fit on the front of the T-shirt! 


The skirt pockets got cut from the back of the skirt, and the side panels, back, and waistband got cut from a dark gray jersey knit I found in my stash.


I quickly sewed up the skirt one evening before bed, and presented it to my sister the next morning. She quickly declared she loved it and it was very comfortable and she wore it to Latin camp with her homeschool co-op that day. Then, she requested another couple skirts from the pattern, and I obliged, though perhaps not as quickly as she was hoping.

The look I get when I don't make her new clothes as fast as she wants them.
The pattern designer did what pattern designers are apt to do during testing and made some minor changes to the skirt pattern. Once that was done, I sewed up a second skirt to test the fit of the updated pattern, and my sister got the skirt she'd requested.


For the second skirt I paired a pink camo jersey knit (left over from making myself PJ pants a couple years ago) with some bright green cotton/spandex jersey. The second skirt was sewn up just as quickly as the first and fit even better! And my sister liked it just as much!


At this point, the pattern designer declared the fit of the pattern was just right and I decided to make my sister one more skirt. After all, she needed something red, white, and blue to wear for the 4th of July!


I made my mom a red, white, and blue, stripes, and fireworks, perfect for Independence Day, dress a couple months ago. And, I had fabric left over from it. 


So, I took those scraps of cotton interlock, along with a random scrap of blue and white starry jersey found in my sewing room, and turned them into an independence day skirt for my sister. She was thrilled!


Thus, on the 4th of July, my mom and sister had coordinating outfits.


And, not to be left out of the fun, I whipped up a red, white, and blue tank top for myself out of the little bit of striped fabric, and the very tiny amount of fireworks fabric, that as left after making the dress and skirt!

 
Three different garments out of under 3 yards of fabric! I'd say we did pretty well with our patriotic fabric this year!


I hope you had an excellent 4th of July with your family and friends! If you're interested, you can get the Gingerbread Gretel Skirt pattern for yourself here. It also comes in adult sizes! Both the child's and adult Gretel Skirt patterns are on sale through tomorrow (7/10/18) for 25% off!

Thursday, July 5, 2018

Making The 1890's McGonagall Inspired Tea Gown - Pockets and Such

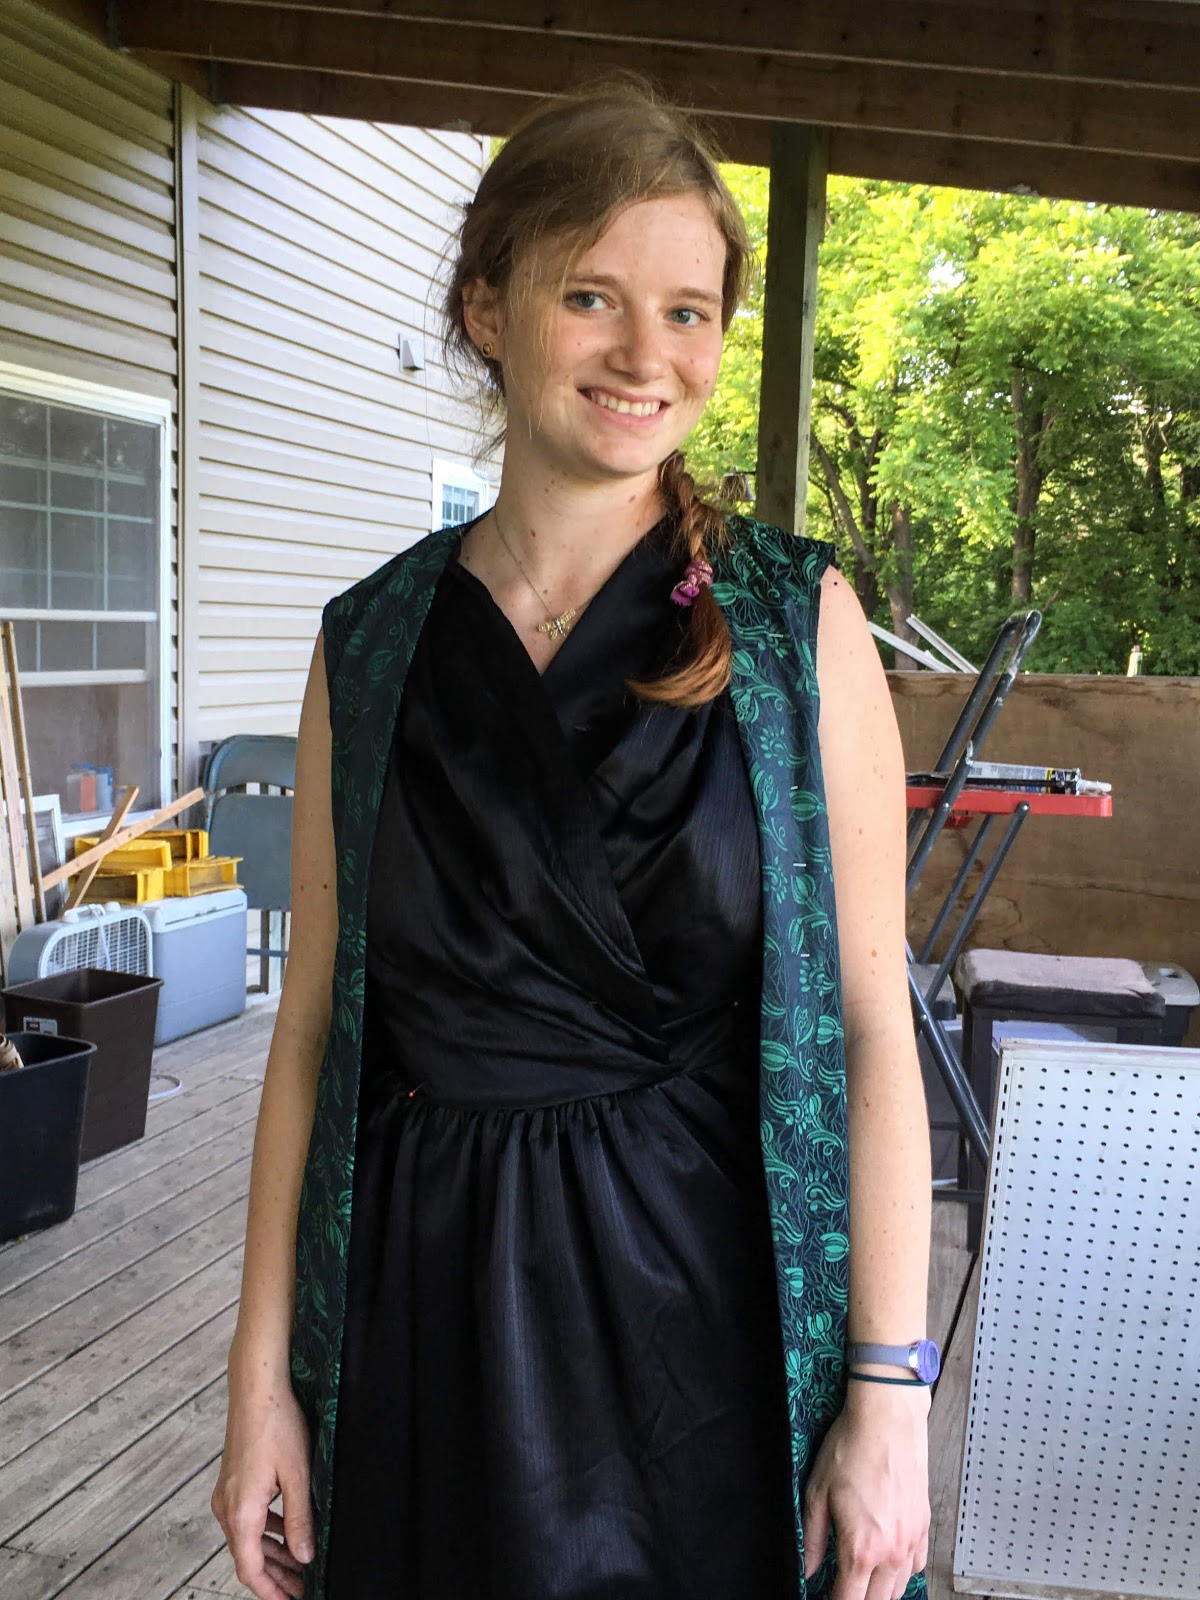
After making nearly 4 mockups of my 1890's tea gown, I had the easiest order of construction for that sucker down pat. Sew the side back panels to the center back panels. Sew the center back seam. Pleat the excess center back skirt fabric, press, pin, and hand sew the pleats in place.


(Ok, so on the mockups I machine stitched the pleats. But on the real thing I hand sewed so the stitching wouldn't show on the right side of the garment.)


Then, move on to the front of the panels of the tea gown - and this is where things got a little more complicated than they had been on the mockups. All those things you don't have to do on mockups, finishing edges, adding pockets, and actually attaching the entire skirt to the bodice? It was time for all that to be done on the real thing.


I pleated the front under bodice pieces just as I had on my final mockup. Then I finished the edges of the left bodice piece with a 2" wide black silk facing. And the right bodice piece? That I attached to the under skirt.

Now, I had not mocked up the front underskirt of my tea gown at all. Nope, I had a vague idea of what the underskirt needed to look like, and how it ought to attach to the bodice and overskirt, and I just winged it on the final garment. Thankfully, that mostly turned out ok. Only one last minute alteration had to be made -  but more on that later. 


The front underskirt was one big rectangle of black silk satin backed with black cotton broadcloth. I gathered the top edge to be a few inches longer than the bottom edge of my under bodice, and sewed it in place. I let the skirt extend past the end of what would be a wrap-style under bodice. The under skirt would reach from side seam to side seam of my tea gown. The wrap bodice would only be covering 2/3rds of that distance. I attached a partial waistband to the upper edge of the skirt where whe bodice ended. 


Once the top edge of the underskirt was all fixed up, it was time to focus on the sides. These would be sewn into the side seams of the "over gown". The left side of the under skirt got a placket, so I would be able to get the tea gown on and off, and where the placket ended, the left side also got a pocket. 


The right side too got a pocket, it's just a little higher up on my hip than the one on the left, as there was no placket to contend with.


 These pockets are completely hidden by the "over dress" when the tea gown is worn - and they are very handy for putting things in!


I finished the front edges of my over dress with 2" facings, just like I did on the under bodice edges. And then, once the placket, pockets, and facings were all fixed up, I attached the under dress to the front over dress at the side seams and shoulders then sewed the front of the tea gown to the back. My tea gown was taking shape! It could now be tried on!


It fit!! And it resembled my inspiration gown! I was feeling good about this thing!


Next, thankfully with no difficulties, I constructed the sleeves and attached them to the gown. I decided to add a wide black velvet ruffle to the ends of the sleeves, and I love the effect it gives!


Now all my tea gown needed was the finishing work - the hems, closures, waist stay, boning, and bum pad. Well, I was almost ready for that stuff at least. Remember how I hadn't mocked up my underskirt? That shortcut came back to bite me. At this point it become obvious the under skirt needed a bit more work - it just wasn't as full at the hem as it needed to be. So, I pulled out my leftover fabric and seam ripper and added triangular gores at the side seams.


Thankfully, I had plenty of black satin left over to use for this. What I no longer had was black cotton broadcloth. Thus, the gores are flat-lined with purple quilting cotton instead, because that's what I was able to quickly find in my stash.

Once the gores were in place, it was time to really finish the gown. There was one internal picture of the gown on the LACMA website that allowed me to see how the dress was structured. (You can click on the picture below to go to the LACMA entry for this tea gown)


From this picture I was able to discern that the gown was supported by boning at the center back and side seams, a waist stay, and a small bum pad. So, I added these elements to my tea gown.


Three steel bones, encased in cotton ribbon on the side and back seams, a waist stay made of fun chevron cotton twill tape, and a bum pad made from scraps of black broadcloth and stuffed with torn up cotton quilt batting. The bum pad greatly improves the silhouette of the back of the gown.


I then hemmed the gown with a wide, bias-cut, cotton corduroy hem facing.


And finally, to finish it up, I sewed two small sets of hooks and bars onto the waist stay, and two large sets of hooks and bars onto wrap portions of the underbodice. 4 hooks and 4 bars, that's all it takes to fasten this gown!


When the last hook was sewn on, my Professor McGonagall inspired, 1895 Liberty of London, tea gown reproduction was done! All that's left to do now is to find as many excuses to wear it as possible! Oh, and a photo shoot, I definitely need more pictures of it!


Even though it was finished a few days after the deadline, this tea gown is my entry for May's Historical Sew Monthly challenge; Specific to a Time (of Day or Year).

What the item is: A Tea Gown - Tea gowns became popular in the late Victorian era. They were garments worn at home, primarily in the late afternoon.

Material: Silk Satin, Silk Jacquard, Polyester Velvet (sleeve ruffles) Cotton Broadcloth (underlining), and Cotton Corduroy (hem facing)

Pattern: A combination of several patterns from "59 Authentic Turn of the Century Fashion Patterns" along with a few self drafted pieces.

Year: 1895

Notions: Thread, hooks and bars, twill tape, cotton ribbon, cotton batting, steel boning

How historically accurate is it? The pattern is accurate. The materials are accurate to this type of garment, have the right look, and are mostly accurate in fiber content (poly velvet being the exception here). This is a copy of a Liberty Tea Gown at LACMA, and I referenced the pictures of the original to help construct both the interior and exterior of my gown. The construction is a mixture of machine sewing with hand sewn finishes, which is also accurate for the period - with the exception of my serged seam allowances. This would be recognizable in its time. So I'll say 80% accurate. 

Hours to complete: Oh goodness, I don't know!

First worn: June 5th, to assure myself it was really done and it really fit!!!!

Total cost: Around $100 USD


Tuesday, July 3, 2018

Three 10k Tanks, All At Once

I live in tank tops in the summer. Those real cheap cotton rib knit tanks from Walmart? Those are my jam. I have a whole rainbow array of them in my second dresser drawer. I've had most of these tanks for about 7 or 8 years now, and they've served me well. But, unfortunately they are wearing out and need replacing.


Now, I could have gone to the store and picked up a handful of relacement tank tops, but what's the fun in that? Tank tops look pretty easy to make! I might as well sew myself some!


That's what I thought at least, however, it turns out there are a lot of things more interesting to sew than plain old tank tops. Thus the tank tops didn't get made - until I gave myself an external deadline to get these garments sewn by.


I signed up to test a tank top pattern - The 10k racerback tank by Pickle Toes Patterns. This color blocked top is a bit fancier than my usual tanks, but its surprising fast to sew and the finished garment is incredibly flattering!


I tested this pattern while I was costuming the Mulan play (yes, I believe I'm insane), and wound up making 3 new tanks during the course of the test. Thankfully, I could easily whip up this top first thing in the morning, right before work. If it hadn't been so quick and easy to make, I would have been in trouble! That play had to be costumed, this pattern had to be tested, work had to be gone to, and the goats had to be cared for - not to mention the dozen or so unplanned for things that seem to creep up every week!


The first top I made during testing might just be my favorite of the three - it's so fun and colorful! The paisley jersey knit I ordered online to make a dress. But when it came it was so bright, busy, and almost garish, I couldn't imagine clothing my entire body in it! A small dose of it in tank top form however? That I could do! And now that's done, and I love the result, so I'm re-considering my original dress idea. I'll keep you posted! The black fabric for the bands was left over from making my sister a shirt, and the blue for the yoke was left from making her a swimsuit. (both projects have yet to be blogged)


After I made the first tank, the pattern designer made some minor alterations to make the already awesome pattern, more awesome. Thus, it was time to make another! Enter version two. 


I actually made this tank out of a knit maxi skirt from Goodwill. Maxi skirts are one of my favorite sources of knit fabric for small projects such as shirts.


The pink fabric from the bands is an athletic wear fabric, (scored at Goodwill for 50 cents!) and the teal is left over from this shirt and dress I made my sister and I over a year ago. The three fabrics came together fabulously for this tank top - but the pattern still wasn't done.


The designer worked out the last few minor pattern kinks, and I made one last tank top to test out the final version of the pattern. This one too I made out of a thrifted maxi skirt, along with a cotton spandex camisole for the bands and some blue double brushed polyester jersey scraps for the yoke.


And for this tank top I tried out the standard tank back, rather than the racer back.


And once again, as with the first two versions, I really, really like the result! Now I've got three new me-made tank tops in my closet, and I hope to find time to make a few more! Maybe a red,white, and blue one for independence day tomorrow?


If you're interested in this tank pattern for yourself, it's on sale for only $6 until Friday (7/6/18)! I received the pattern for free in exchange for testing, but the positive review is all my own :)


Tuesday, June 26, 2018

Mocking Up and Cutting Out the 1890's Tea Gown

I made my apportioning rulers. I drafted the pattern. I sewed a mock-up. My long planned for 1890's, Professor McGonagall inspired, tea gown was going to become a reality!


Well, it would become a reality, after I perfected the pattern. It turns out measuring your own back length (nape of neck to small of back), all by yourself, does not produce very accurate results. Somehow, by doing this, I added over an inch to my back length. Then I used that too long measurement to make my back measure apportioning ruler. The result? My first mockup fit perfectly around, it was just much too long. It wrinkled horribly at the waistline and the skirt dragged on the floor.


The skirt length? That could be easily chopped and fixed. But the bodice length? That required some pattern alteration.


I pulled out my plastic pattern and folded an inch out of the bodice length, right above the waistline, on every single pattern piece. Then I made another mock-up.


Mock-up #2 fit better than mock-up #1, but it wasn't perfect. The center back length, from neck to waist, was just about right, but the side panels were still too long. So, I pulled out my plastic pattern again and folded another inch of length out of the side panels only.


That done, I made another mock-up, and it appeared that the third time was the charm!


No wrinkles this time!! The main tea gown pattern was good, and I could move on to perfecting the sleeves. Those took another 3 mock-ups. 


Eventually, I had a flounced sleeve puff thing that resembled the sleeves of my inspiration tea gown.


The very last thing I did to my pattern was make some minor alterations to the pleat arrangement on my under bodice pieces.


And with that, I could, at last, cut into my pretty silks and begin sewing my actual tea gown!


To give my tea gown the structure it needed, I flatlined the entire thing with black cotton broadcloth. The flat lining was the first thing I cut out, and it ate up an entire 8 yard bolt of black cotton!


After ironing and lint-rolling (black cotton is a magnet for wrinkles, lint, and pet hair!) each individual piece, I marked the "right side" of each one with a safety pin. (Both sides of the black cotton look and feel exactly the same.) I would be using my flat lining as the pattern to cut out my silk, so these safety pins would allow me to be extra sure I wouldn't cut out any pieces backwards. I didn't have enough of my green and black silk jacquard to make any cutting mistakes! 


When I bought the fabric in Malaysia, I didn't buy enough for a tea gown the first time I was in the fabric shop. I only bought 2 meters, and I had no specific plan for the fabric. Upon returning to my Airbnb with my purchase, I realized it was the perfect fabric for the tea gown I'd been dreaming of! I was going to have to go back to the fabric shop to get more! Well, it was a week before I managed to do that. When I returned to the shop, all that was left of my silk was a remnant that was a little more than a meter. So, I bought that and another silk jacquard remnant, that happened to be the same colorway, but a different pattern. Thus, when it was finally time to cut out my tea gown, I was just hoping I would have enough fabric. Thankfully, I did!


The front pieces fit on my 2 meter length of fabric. With a bit of piecing, the back pieces were able to be cut from the smaller length of fabric. The under sleeves were cut from the coordinating jacquard.  And finally, the train, over sleeves, under bodice, and under skirt were cut from my black streaked satin.


I kept the back cotton securely pinned to my silk until I attached the two layers together permanently using my serger.


Yes, using a serger is not historically accurate, but I was willing to sacrifice accuracy in this department. Serging the edges not only had the advantage of attaching the flat lining to the main fabric easily, it also finished the edges of my very fray-prone silk, before that could become a problem. I have no regrets about using my serger on this project. In the end, it made my fabric easier to work with and had no effect on the over all look of my tea gown.


After nearly a year of dreaming, months of planning, three mock-ups, and some very careful cutting, I could finally construct my tea gown!