Sunday, December 12, 2021

The Bridesmaids' Dresses (and Jumpsuit!)- Simplicity 8202

 Of course I was making my wedding dress - that was non-negotiable. 

And the flower girls' dresses, little girls are so much fun to make dresses for. How could I not make those??

Now as to the bridesmaids' dresses. I wanted to make those too, but would that be biting off more than I could chew? Would I have time to make everything?

That was the question.


Well, thanks to some pretty awesome friends and family, the hand made bridesmaids' dresses I'd envisioned became a reality.


When I first got engaged, the topic of bridesmaids dresses came up pretty quickly between my sister and I. What did I want them to look like? What color would they be? Well, I had that all about half to three-quarters of the way figured out.


The dresses would be dark green - one of my very favorite colors, and one that would look pretty good on all three bridesmaids too.


As for the design, I had an idea for that too. A couple years back my sister picked out Simplicity 8202 during a pattern sale. She and I hadn't taken the time to make it yet, so I suggested we make her bridesmaid's dress out of it. View A would be perfect!


My sister was onboard with that plan, now we just needed to figure out the other two bridesmaids' dresses. I had my two best friends over, showed them the pattern my sister had picked out, told them the color I had in mind, and suggested they go through my pattern stash and pick out patterns for their dresses. They both looked at my sister's pattern, declared they liked it and suggested we make all three bridesmaids' dresses from it. Ok, that was easy!


That decided, we discussed the feasibility of actually making the dresses. My bridesmaids offered their assistance, and we decided to ask their mothers and my mother if they would all be willing to help too. If we could get enough people together to sew, we could probably knock all three dresses out in one weekend. 


We asked those involved in our scheme if they would be willing to help and they agreed. One Saturday in April we would all get together and make these dresses! There just a few things we needed to do first to get ready for this sewing day.


First I measured all three bridesmaids. They were each one size apart from each other. I did not feel like taking the time to trace off the pattern in three different sizes, so I just went and bought 2 more copies of the pattern the next time Joann's had Simplicity patterns on sale. Spending an extra $4 saved me a couple hours of frustration. Tracing patterns is not my favorite thing!


 Next, a couple of us went to Joann's to pick out fabric. I did not want a shiny fabric like satin, or a stiff fabric like taffeta. I wanted something soft and drapey with a matte face. Something like chiffon, only not chiffon as I didn't hate my friends and family who were helping with the sewing, so I was not going to put them through the torture of sewing with chiffon.


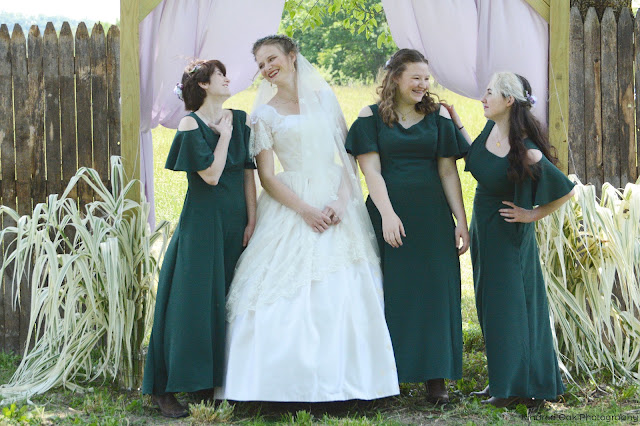
After a walk through the fabric store, we found just the right material. A dark green polyester crepe with a lovely drape and soft sheen. Nothing else compared.


There was just one issue. My local Joann's only had one yard on the shelf. We took the bolt up the counter and asked if they could order more for us. 
No, this fabric was discontinued.
Well, crap.
They could however call around and see if any other Joann's stores had the fabric in stock, and if so they could have it shipped to my Joann's for me to pick up.
Yes, let's try that!
They called around, and between 3 stores in 3 different states they were able to find 10 yards of the fabric - just about the amount we needed for 3 bridesmaids dresses! Woohooo!
This would work!


While we waited for the fabric to come in, it was back to the patterns. I cut out each pattern in the right size and made a few minor alterations.


We all thought the neckline on the pattern looked too high for comfort, so I lowered it a couple inches and gave it a slightly squared shape to reflect the square neckline on my dress.


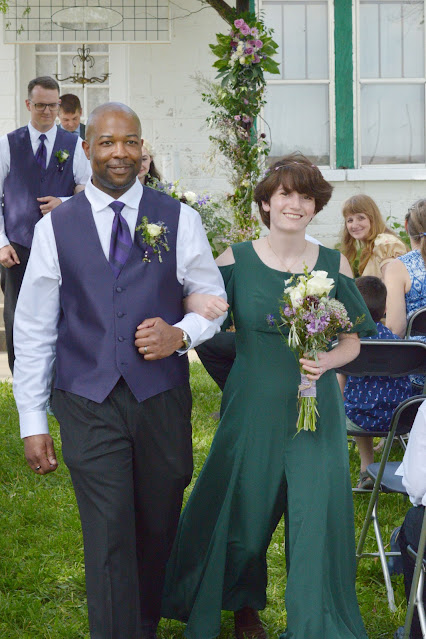
One of my bridesmaids does not enjoy wearing dresses, so I altered her pattern to be a wide legged jumpsuit rather than a dress.


I pulled out Butterick 3836 (the pattern I used to make my split skirt) and grafted the crotch curve and inseam from it onto the center front and back skirt panels of the dress pattern. To do this I had to change the center front panel to have a center front seam rather than being cut on the fold, but that was easy enough to do. Just don't forget to add seam allowance!


Once the pattern pieces were all cut out, altered, and ready to go, my bridesmaids came over for an evening of cutting out. We labeled all the pattern pieces with the bridesmaids' names so pieces wouldn't get mixed up.


Each bridesmaid was then assigned a different pair of scissors to cut with. One bridesmaid's dress would be cut out with normal fabric scissors. One would be cut with pinking shears. And the last one would be cut out with scalloped pinking shears. The goal was that once all the dresses were cut out and the pattern unpinned we would be able to easily tell which pieces were for which dress based on which shears they had been cut out with.


After a couple hours that evening, all the dress pieces were cut out and stored away in a zipper bag to wait for our sewing day!


One Saturday morning, a week or two later, everyone arrived at my parents' house by 10am, ready to make these dresses!


One person pinned pieces together and kept an eye on the instructions to make sure things were going together in the right order.


The pinned pieces were then passed off to those on the sewing machines to be seamed together.


After the seams were sewn, they were passed off to those at the ironing boards to be pressed. 


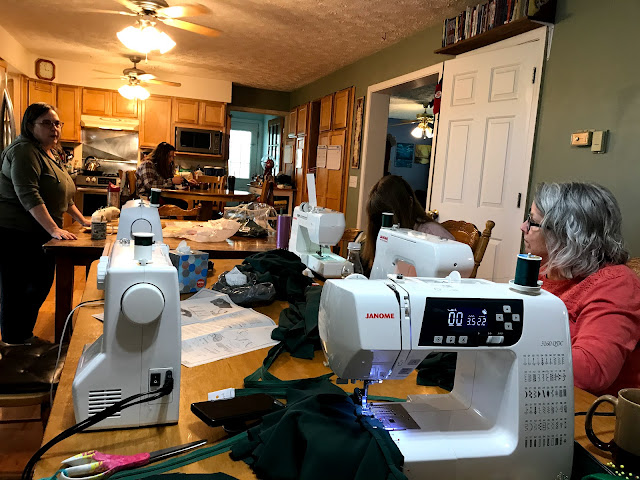
Then back to the pinning and sewing tables the pieces went until each dress was completely assembled.


By 10 o'clock that night, 12 hours after we began, all three dresses were done!


All that was left to do was the hems, but I could easily do that on my own time.


The dresses fit!


They looked fantastic!


And appeared to be comfortable!


We all felt pretty darned accomplished!


Within the next few weeks I hemmed the dresses and stitched each bridesmaids' initial into the back neckline so we could tell whose dress was whose without having to look at the seam allowances to see what scissors the dress had been cut out with. 


And about 6 weeks after our sewing day, everyone was zipped up into their dresses.


Feet were slipped into brown cowboy boots.


And my little sister and two best friends stood up beside me while I said "I do!"


I am so glad we decided to make the bridesmaids' dresses ourselves!


We had fun working on the project together.


Everyone was comfortable.


And looked fantastic!


If we hadn't made the "dresses" ourselves my friend wouldn't have gotten this marvelous wide-legged jumpsuit/romper thing, which was the perfect choice of formalwear for her!


The work was worth it!

Wednesday, November 24, 2021

A Joyful Cobalt Blue Wool Joy Jacket

 A few years back, Chalk and Notch patterns came out with the Joy Jacket pattern. When they first announced the design, it caught my eye and I applied to test it. I did not get accepted as a tester at that time, which really isn't a surprise seeing as the original Chalk and Notch size chart didn't really suit my body type. It was drafted for a B cup in the bust, and my bust is decidedly not a B. My bust measured a good 2 sizes larger than my waist and hips according to the size chart. This meant I'd have to make some significant pattern alterations to get a decent fit, which wouldn't be great for a pattern test where one of the goals is to test and see if the pattern properly fits the size it is meant to fit. 

That said, I still really liked the design of the Joy Jacket, and have admired the many different versions of it I've seen come across Instagram since the initial pattern release. 


Since that initial pattern release, Chalk and Notch has decided to extend and update their size range in more ways than one. First, they added a few more sizes so their patterns now fit up to a 58" bust and a 59" hip. Second, they added a second bust cup option to accommodate those of us whose bust can't, won't, will not, be able to squeeze into anything remotely resembling a B cup. 

On the new size chart my measurements all fit beautifully into one size with the new C/D cup option!


Since expanding the size chart, the pattern company has been updating all their old patterns so all the patterns are available in all the sizes. A few weeks back, I saw that the Joy Jacket update was ready to be tested, and I decided to apply to help out with that.


Chalk and Notch patterns attract a lot of applicants for testing, so I didn't really expect to be chosen, but hey, it didn't take that long to fill out the application, so I might as well try! My measurements put me perfectly in the size 6 with a C/D cup, so maybe, just maybe, there wouldn't be a whole lot of applicants with those exact measurements so they could use my help?

A few days later, I got an email saying I'd been chosen as a pattern tester. This honestly surprised me. And I slightly freaked out. My fabric stash currently resides about 2 hours away from me in my parents' basement. And I wouldn't be going back to visit before the pattern test started. So what was I going to make this jacket out of?!?! I had no suitable fabrics stashed away in any corners of the apartment!

This pattern is designed for medium-weight woven fabrics with a lot of drape in them. Nothing too stiff or heavy. Tensel twill is the fabric of choice. 


I went to Joann's to scout out their fabric options, and discovered that they did indeed have a bolt of Tensel twill on their shelves. It was black? dark gray? A color I don't usually gravitate towards, and it was $30 a yard. This was more than I wanted to spend, especially for a color I wasn't particularly excited about.

So, I left Joann's that day with some plaid flannel for the lining of my jacket, some flannel-backed satin for the sleeve linings, and an idea of what Tensel twill felt like, and how it draped, so I could search out a less expensive, and hopefully more colorful, alternative. 


Honestly, the Tensel twill had a very similar hand and drape to the light and mid-weight worsted wool twills I've handled. Back in my parents' basement I have a rather large stash of wool, and I could immediately think of several pieces which would be suitable for this jacket. However, as afore mentioned, I would not have access to that beautiful fabric stash in time to make this jacket for the test. I would need to find another way to procure the proper material.


I went to that local sewing room I've mentioned a few times, the one that sells donated fabric for $1 a pound, and searched their shelves for something, anything, of the correct weight and drape, with enough yardage (2.5 yards, 60" wide), in a color I liked. 


It took some looking, but I eventually settled on something that would do. 3 yards of cobalt blue worsted wool twill came home with me. The color was not my first choice (I don't think I have anything else in my wardrobe in this shade!), but the drape was right, the weight was right, the yardage was good, the price couldn't be beat, and the color would grow on me.


I went home, printed out the pattern that had been sent to me for testing, assembled it with the overly energetic help of my kittens, and got to work.

In a couple days, I had a new jacket. One that looked absolutely fantastic! 


The more I worked with it, the more I liked the color of my fabric.


The pattern itself is very well drafted. It features separate pattern pieces for lining and the shell, which allows for a much nicer, better fitting, more comfortable finished garment than one using the same pattern pieces for both the inner and outer layers would have been. 


Interfacing is used liberally throughout the design, which really helps to get a nice clean finish with pretty crisp edges.


If you follow the instructions you just can't help but to have a very nice, professional looking, finished garment in the end!


To add my own twist to the finished jacket, I decided to use petersham ribbon for my drawstring. It, the metal zipper, and the grommets, all came out of my stash. (I've managed to fit most of my notions stash into a closet in our apartment, it's only my fabric that I'm separated from.) The zipper is actually a couple inches shorter than in should be, but it's what I had on hand and it works well enough.


Despite my separation from my fabric stash, and my initial anxiety over where I would acquire a suitable fabric for this project, the pattern test was a very pleasant experience overall. Chalk and Notch pattern tests are very well organized, with clear communication and expectations, which isn't something I can say for all of the pattern companies I've tested for.


The finished jacket is great! The fit is spot on (All I had to do is lengthen the sleeves 1", which is a very common adjustment for me.), and I've worn my jacket almost daily since finishing it!


Thank you Chalk and Notch for expanding your size range to better fit more of us, and thank you for including me in your pattern test!


With the Joy Jacket update done, all the patterns now feature the full size range! In addition, the entire Chalk and Notch catalogue is on sale through November 30th, so if you'd like to add this pattern to your stash, now is the time to do it!

Chalk and Notch Holiday Sale 2021 coupon codes⁠
All patterns, PDF & Printed, are on sale through Nov 30th! ⁠
hol20 for 20% off any purchase⁠⠀⁠
hol25 for 25% ⁠off when you spend $25⁠
hol30 for 30% off when you spend $50
Free shipping and gift with any order of printed patterns ⁠

*I received this pattern for free in exchange for testing it out, but all thoughts and options here are my own. I was not required to write this blog post in any way, shape, or form.