I got Covid. Yep, I actually got the Corona Virus. Thus, I wound up quarantined for nearly 3 weeks. And what did I do during quarantine? I made myself a new pair of stays. (btw - I'm all better now! Recovered well, no worries!)
Alright, the plan for these stays actually began long before I got sick. When
the Augusta Stays pattern, by
Scroop Patterns and
Virgil's Fine Goods, came out last year, I was intrigued. Last spring I made myself
my first ever pair of 18th century stays using Simplicity 8579. Now, Simplicity patterns, of course, only really give you instructions on how to make things using modern construction methods. Thus, I was at a complete loss when it came to figuring out how stays would have been constructed historically. I had a bit of information, gleaned from other costumers and a bit from books, but step-by-step historical instructions would have been very, very, helpful.

My Simplicity stays turned out well (I'm still quite pleased with them, and they are very comfortable!), but they definitely left me with the desire to learn more and make my next stays using more historical methods. Thus, when the Augusta Stays pattern was released last summer, boasting both in-depth historically accurate instructions and a set of instructions using modern methods to achieve the same results, I knew I wanted to give this pattern a try! My first pair of stays gave me a good mid 18th century silhouette - rather straight up and down with a conical shape and a flattened chest. Just what I needed to go under my 1760's Robe a la Francaise. The Augusta Stays on the other hand have a 1780's shape, which is a bit more curvy. As I had (and still have!) several 1780's projects planned, these stays would fill a gap in my historical wardrobe.

I bought the pattern last November during the Scroop Patterns Black Friday Sale, and 8 months later, in July, I decided it was a good time to get started on this project. I printed out the pattern, read through both the historical and modern instructions, figured out what size I needed, gathered my materials, and made a cardboard mock-up.
The Augusta stays come with two different "fit" options, depending on your bust to waist ratio. The "straight" fit is drafted for those with a natural difference of 6" or less between bust and waist measurements. The "curvy" fit is drafted for those with a natural difference of 8" or more between bust and waist measurements. My measurements put me in a size 36 curvy, so that's what I made. My cardboard mock-up fit decently so I decided to skip a proper mock-up and just get to making my actual stays.
My stays would be made from 3 layers of linen. A pretty pink linen on the outside (left over from
this dress I made my sister several years ago), and two layers of heavier linen on the inside, which the boning would be sandwiched between. I found several yards of heavy natural colored linen at a thrift store several months ago, and it was just the thing for this project!
Historically, the structural layer of stays was made from linen buckram - a heavy linen stiffened with a gum.
The Dreamstress has a blog tutorial on how to make this linen buckram using both the historical gum tragacanth and the more easily available modern xanthan gum. Following the tutorial, I used xanthan gum to stiffen one layer of my heavy linen.
I tried to mix up the xanthan gum and water mixture with as few lumps as possible - but it was down right impossible to avoid lumps at all! Thankfully, my lumpy gum mixture still painted onto my linen interlining pieces ok.
It took less than an hour for me to apply the xanthan gum to both sides of all my interlining pieces, then I stuck them out in the middle of the yard to dry in the sun.
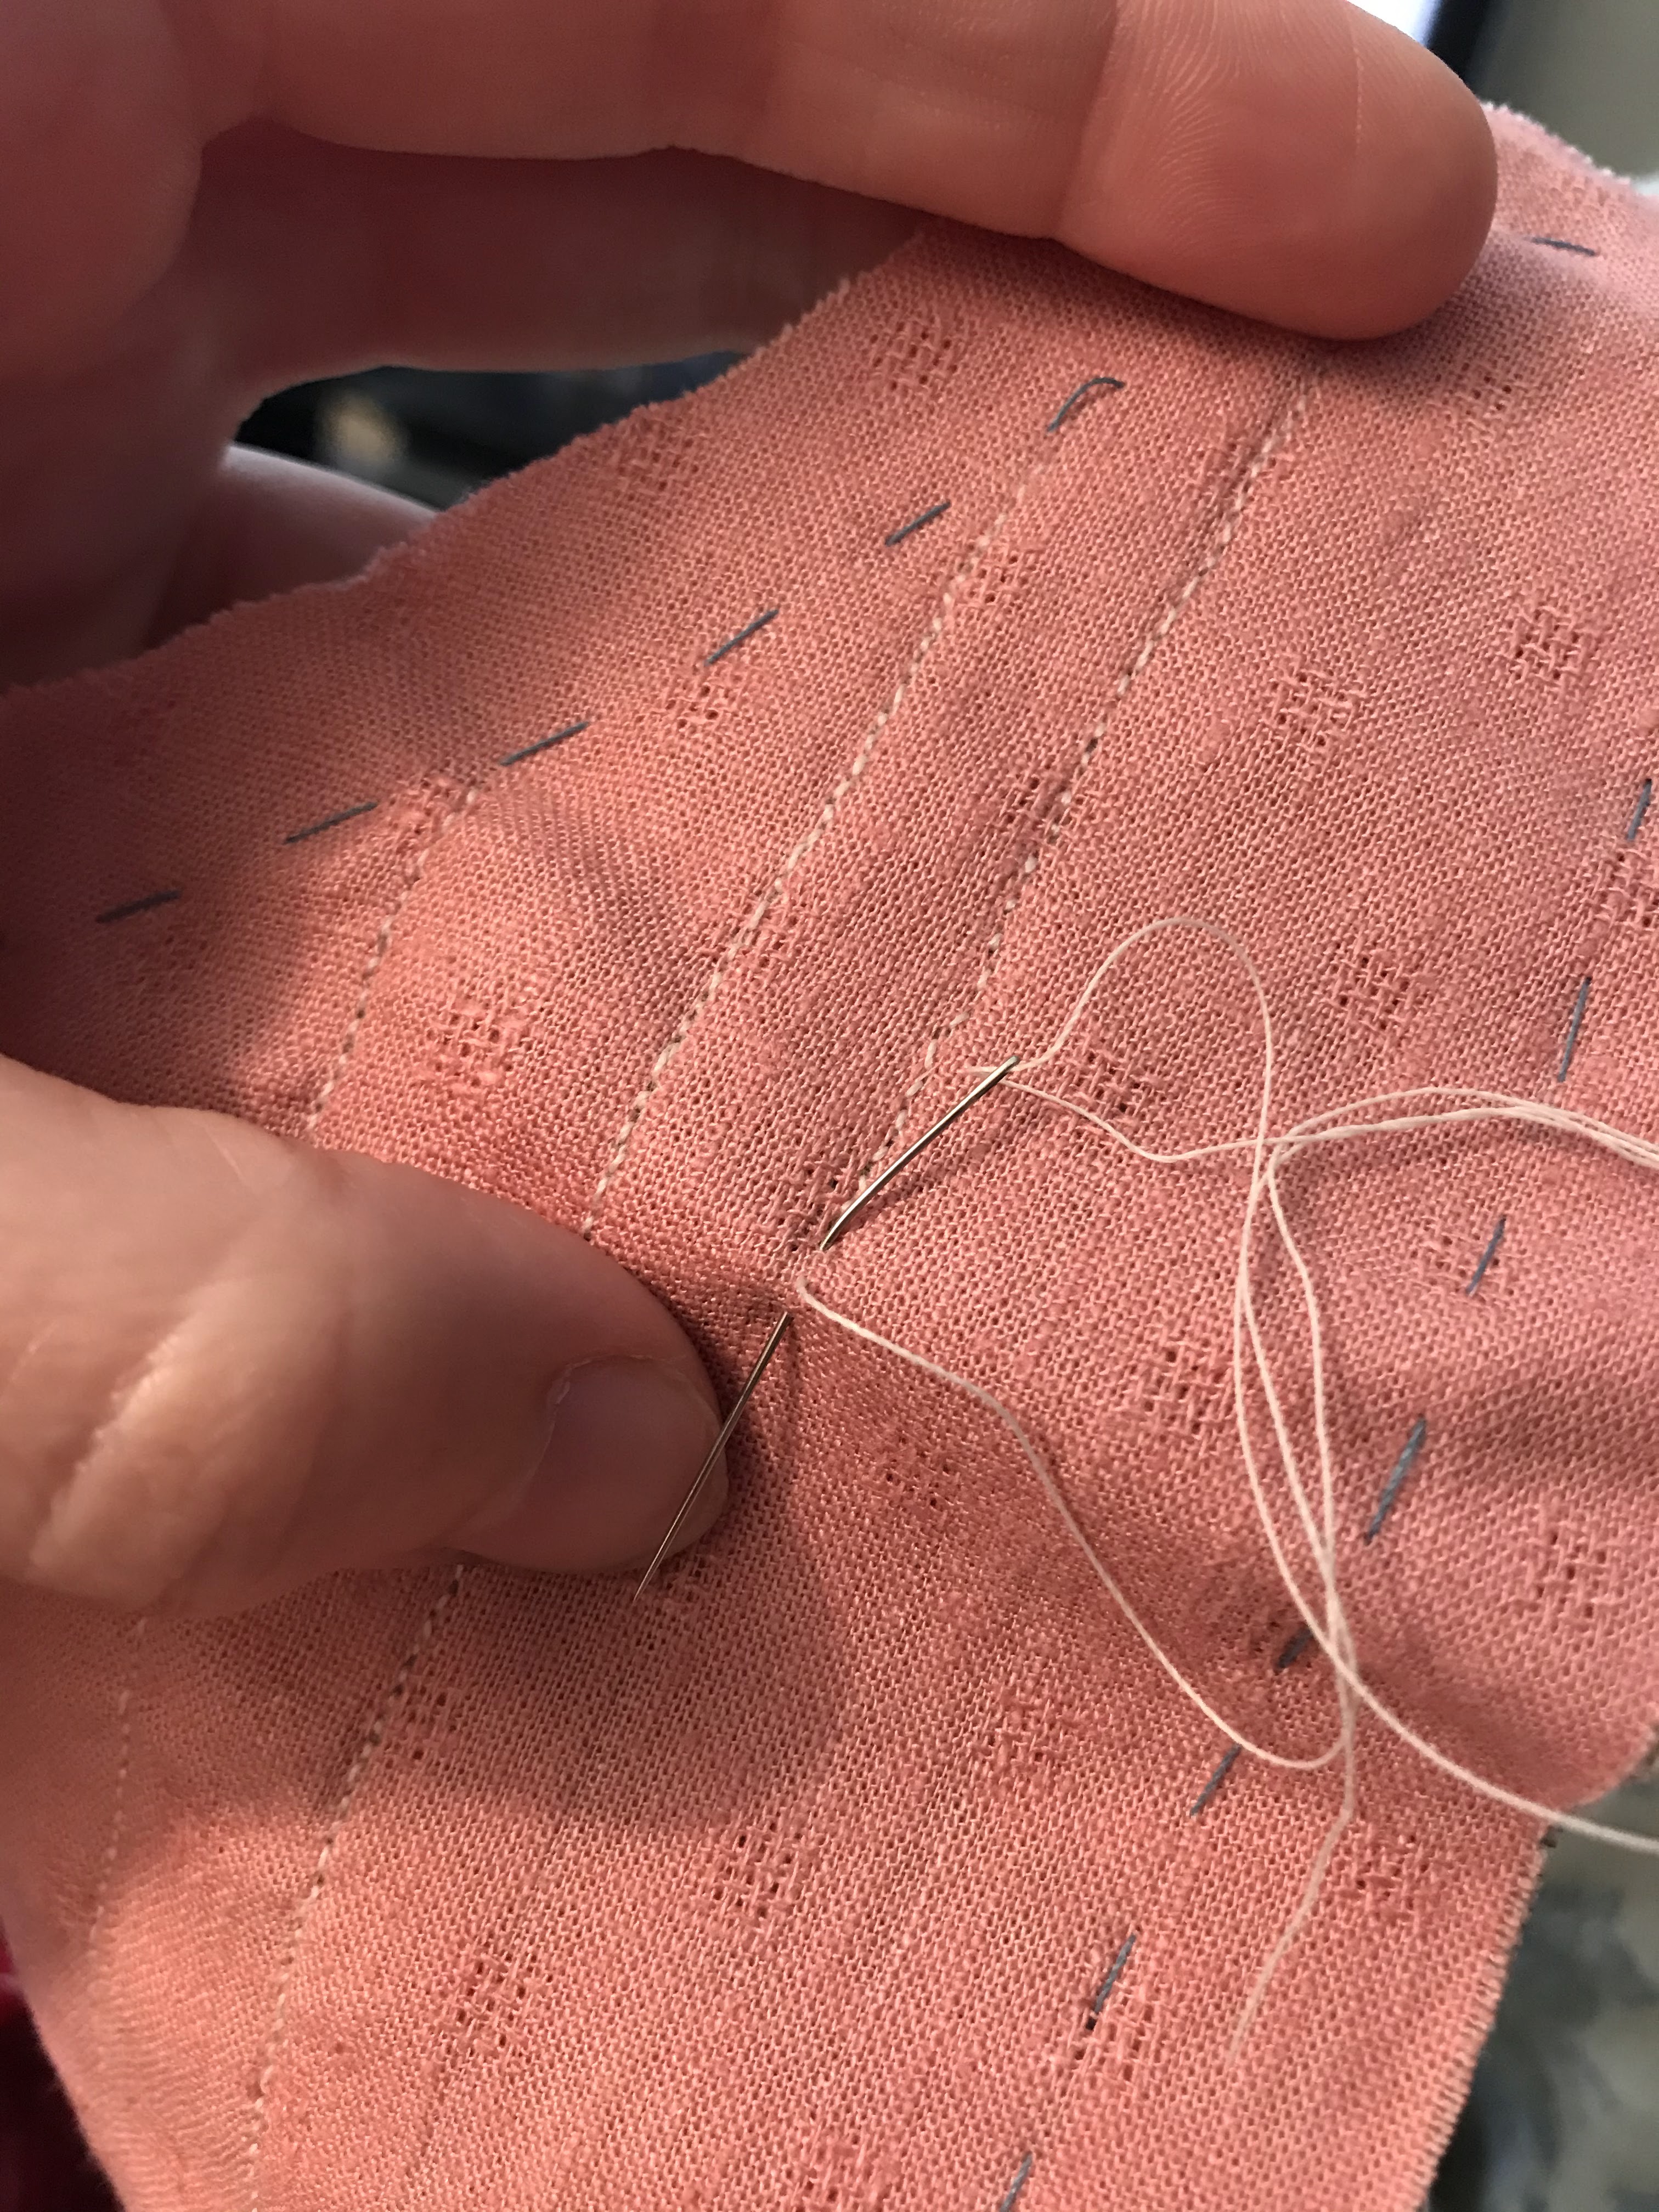
Once my new linen buckram was dry, I was ready to baste the three layers of my stays together in preparation for assembly! That is, I was ready to baste the three layers together after I marked my boning channels and seam lines on the pink linen layer.
I used a transfer wheel and paper to add all the relevant markings to my pink linen. Then I remembered the boning I would be using for my stays was a bit wider than recommended for this pattern. All my new boning channel markings would be pretty nearly useless, and just make my stays look messy - eek!!

To more or less hide this mistake, and since my fabric looked the same front and back, I flipped all my pink linen pieces over, so all the markings would be face down against the interlining, rather than face up and visible. I could still see a shadow of the markings through the new face up side, and this was a good thing. I needed to see my seamlines and the shadow of the original boning channels would give me a starting point when it came to configuring my new boning channels of the correct width.
Boning channels marked, groaned about, and then ignored entirely (well, pretty much), I was ready to actually layer and baste all my layers together. First came the un-stiffened layer of natural colored heavy linen. On top of this was laid the linen buckram interlining layer.
The xanthan gum shrunk the pieces it was painted on just a bit in length and they all turned out to be 1/2" - 1" shorter than the unstiffened linen pieces. (My fabric had been pre-washed and dried, so I don't know why it still shrank!) Thankfully, this pattern has decent seam allowances so the little bit of shrinkage didn't hurt anything.
The pink linen was then layered on top of the buckram, and all three layers were basted together along the seamlines. Once the basting was done it was time for boning channels - the one stage of construction I was dreading. Boning channels aren't very fun to sew and they stress me out! So, for the time being, I shoved all my nicely basted together stay pieces into the bottom of my sewing bag and completely ignored them for the next month. Then Corona happened.

I went to visit my boyfriend one weekend (we live a couple hours apart - yes, it's inconvenient at times.) While I was there he developed a fever. At this point all there was for me to do was stay put with him until we confirmed whether or not he had Covid. I'd certainly been exposed to whatever he had, and I did not want to expose my family for sure! I called home, texted some friends, and learned my best friend had some family members coming to the town I was in the next day. They were able to bring me my sewing bag and some clothes. (Dropped off contact free of course!)
The first thing in my sewing bag was
the sleeves of my 1901 evening gown, so I finished those up within a day or so. Once those were done, the next thing in my sewing bag was the stays. I began sewing boning channels - by hand!
A couple of days in, it was confirmed that my boyfriend did indeed have the 'Rona and I got sick too. We were in this for the long haul. At least I had boning channels to keep me occupied during quarantine!
It took me a week to handsew all the boning channels in the first 2 (out of 8!) panels of my stays. To be fair, there were a couple days in there I didn't get any sewing done at all because I was too sick and stayed in bed all day. Even considering that however, this handsewing boning channels thing was slow going.
About half-way through our official quarantine, my boyfriend and I were starting to feel better and getting restless. We decided to drive back to my home and pick up my sewing machine, some clothes my mom had packed for me, and a few board games (We'd gotten tired of playing the same card game over, and over, and over again.). My mom had set all these things out in the yard for me so we were able to pick them up contact-free and didn't risk exposing any of my family.

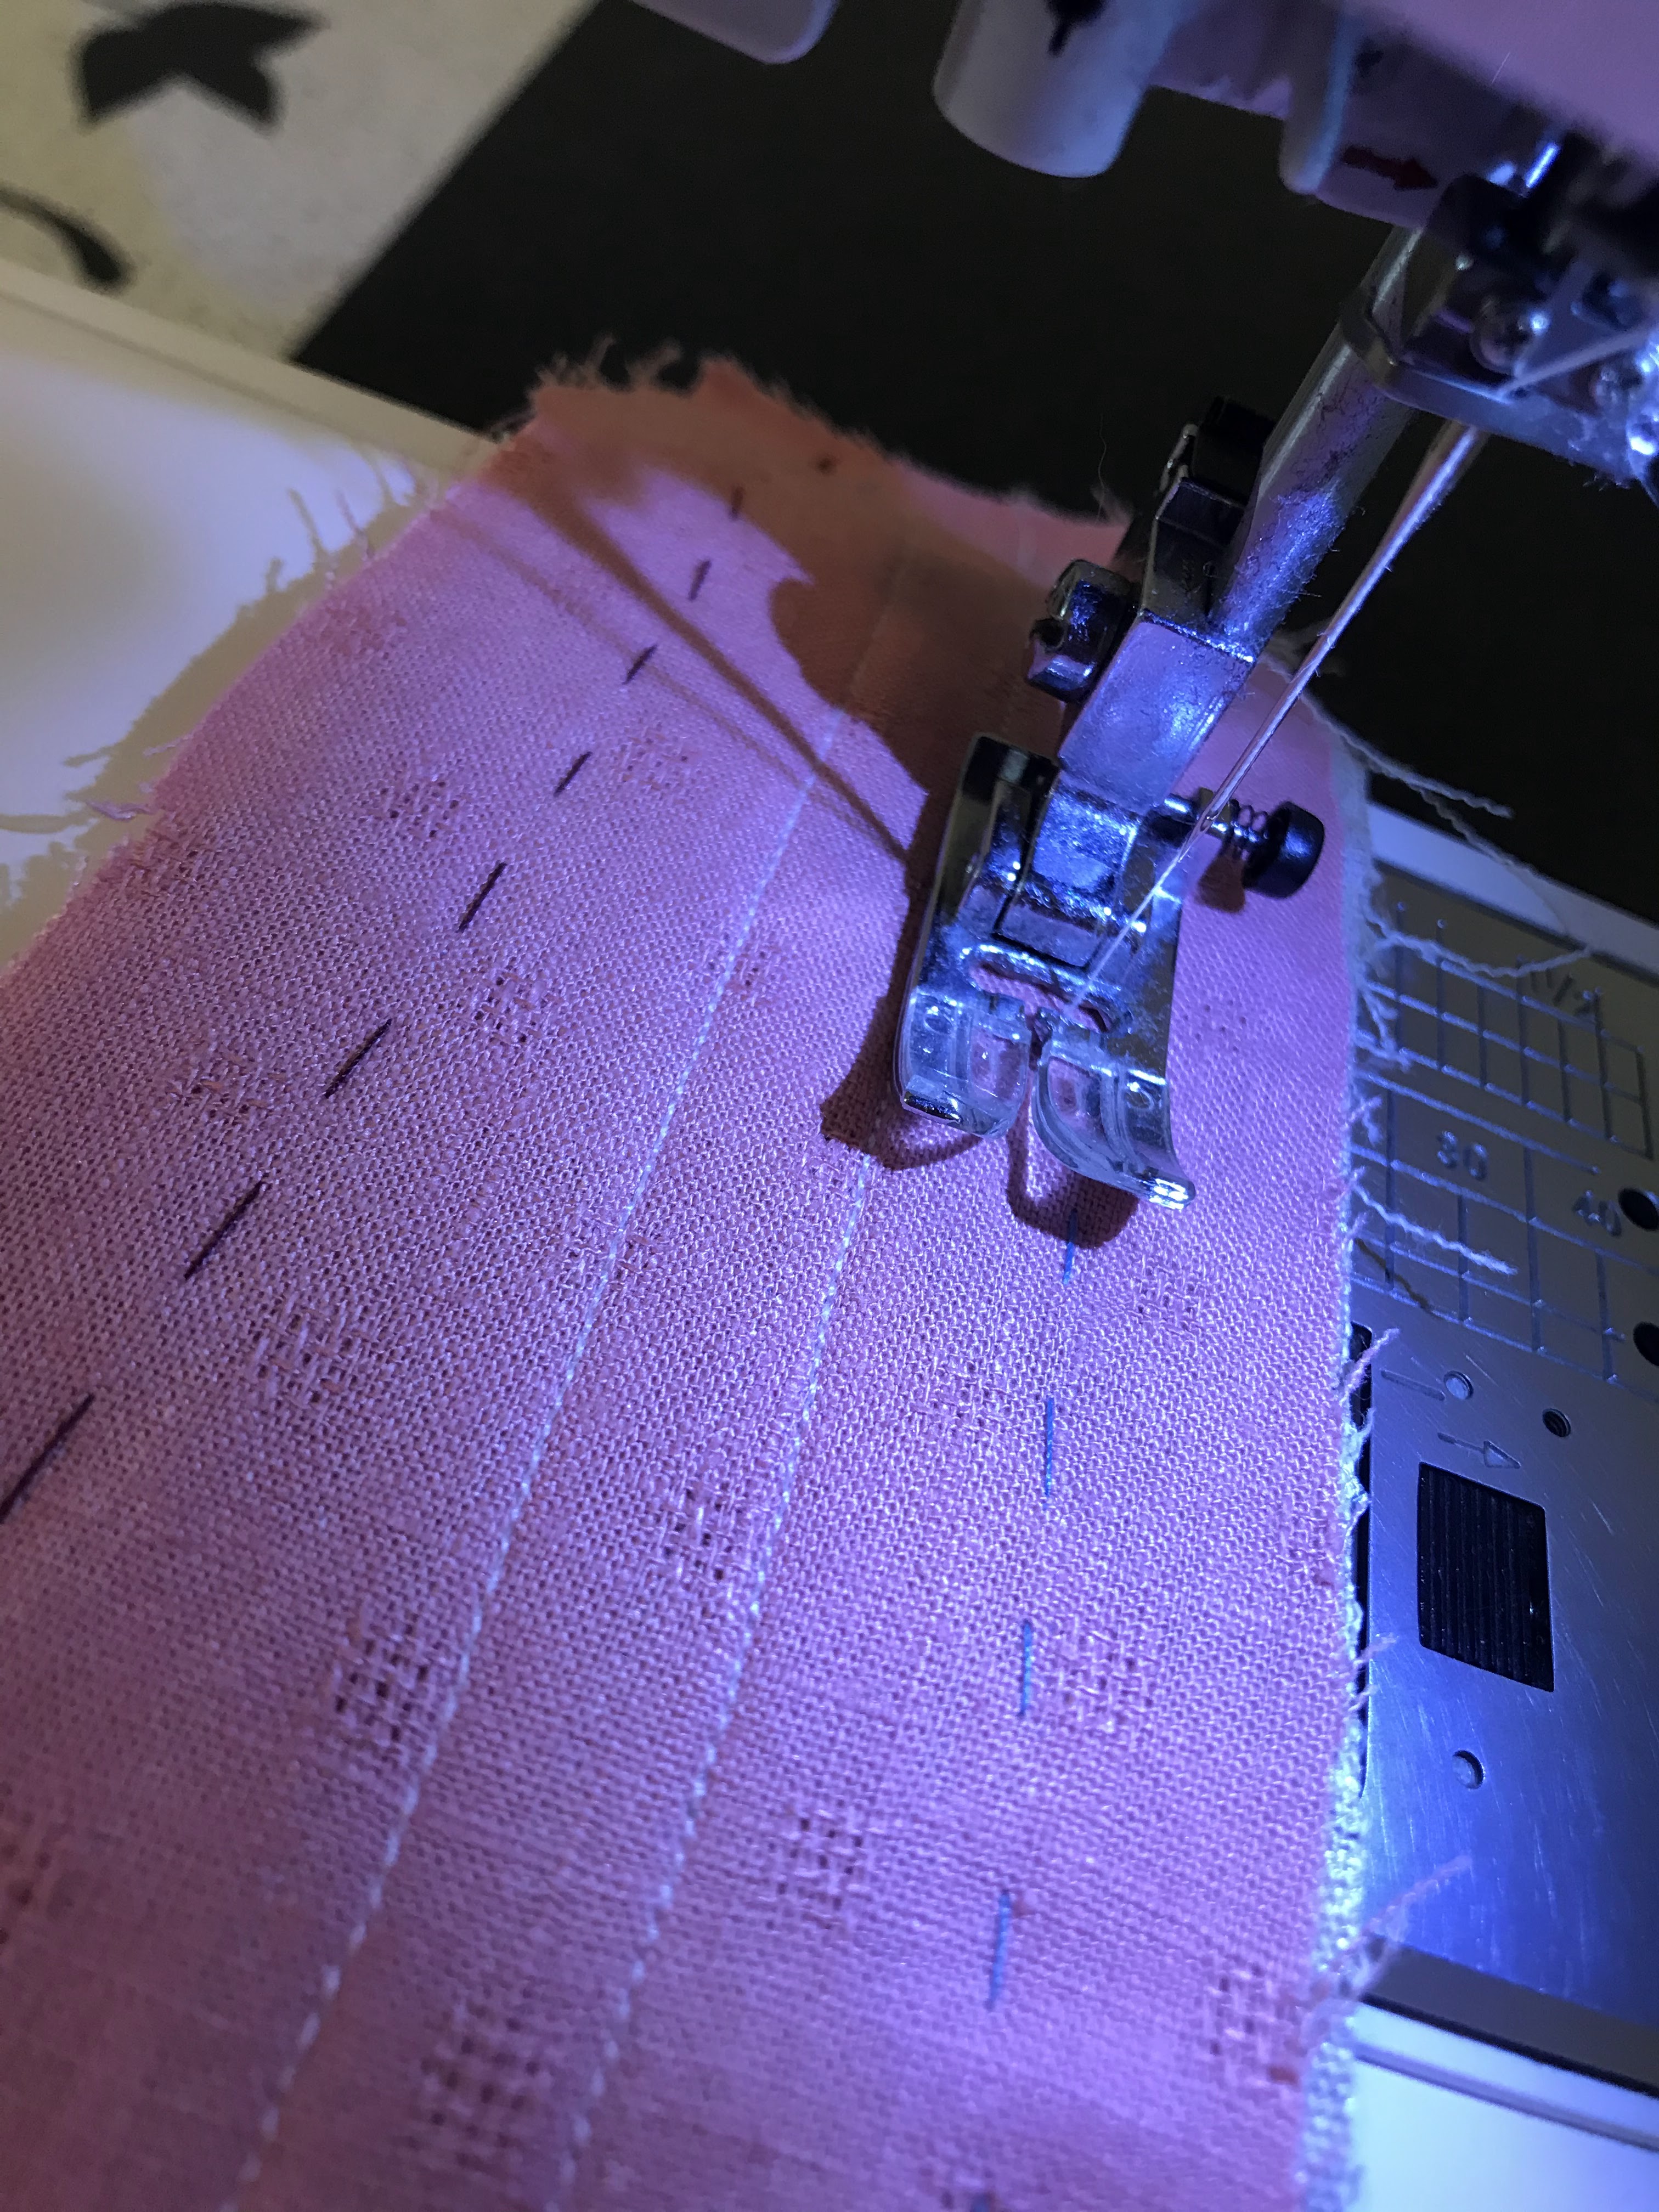
Upon being reunited with my sewing machine, I went ahead and machine sewed the remainder of my boning channels. Machine sewing was so fast and easy!!! I figured out how wide my boning channels needed to be and moved the needle over to one side on my sewing machine so the width from the edge of the presser foot to the needle was the width I needed. This made keeping all the boning channels neat and straight simple! I kept the boning templates right next to the sewing machine so I could reference them as I sewed. I then just more or less free-handed my boning channel placement based on the template. Since my boning channels had to be wider than those on the template to accommodate my wider boning, I wound up with about one less bone per panel than originally recommended.
Once all the boning channels were sewn, I pressed all the seam allowances inward as the pattern recommenced.
Then it was time to sew the eyelets! Out came my awl and silk buttonhole twist!
The Augusta stays are made to be back lacing with optional partial front lacing. I chose to alter mine a bit and make them fully front and back lacing because full front lacing makes putting stays on yourself way easier than it is if they just lace up the back.
The thing about making stays front and back lacing? That's a heck of a lot of eyelets to sew! Thankfully, I don't actually mind sewing eyelets. Over the years my handsewn eyelets have slowly gotten better with each project so I'm now confident they'll turn out decently whenever I have to sew them! They may not all always be perfect, but they will be functional.
After a couple days, all 54 eyelets were sewn! I learned I could sew about 5 eyelets per hour. So yeah, there's about 11 hours of hand sewing just in those eyelets alone. I have no idea how many hours are in the stays all together.
Eyelet's done, next up was boning the stays. I used heavy duty zip ties for boning. I've heard these behave similarly to synthetic whale bone (the recommended boning material for this pattern) Zip ties are just way easier to come by and considerable cheaper than synthetic whale bone, so they're what I use for most projects where a whale bone substitute is required.
I cut all my zip tie bones to the correct length and shoved them in the channels. Somehow I managed to make a couple of my channels a touch too narrow. Rather than seam rip and re-sew those channels, I just trimmed a couple zip ties to be narrower. It worked.
Once all my boning was in place, I whip stitched down all the seam allowances I'd pressed in before adding the boning. Then "real" assembly began.
Using four strands of heavily waxed thread, all the panels got whip stitched together using a very dense whip stitch.
I made my stitches as close together as I possibly could, but they're still not as close together as the pattern recommends! Oh well, I'm confident my stitches are strong enough to do their job.
I somehow managed to break 2 different hand sewing needles whipping these suckers together. At last, it was done, and I laced them up to check the fit before adding binding.
 |
| Didn't have my shift with me, so my nightgown worked as a decent stand-in. |
They fit!!! Ok, so I accidentally laced them a little bit too tight in the back so they couldn't be laced fully closed in the front, but that could be easily adjusted next time I laced them up.
Fit checked, I machine sewed around the top and bottom edge with a zipper foot to keep all the boning securely in place.
Machine sewing around the tabs on the bottom edge was hard! Darned near impossible!! Hand sewing would have taken longer, but been way easier!
Finally, I trimmed down the edges and started sewing on the binding. My stays were almost done! The end was in sight!
I decided to bind my stays with vintage petersham ribbon. This is not at all a historically accurate binding choice, but I had it, it was pretty, and I thought it would be relatively easy to work with as far as stay binding materials went. It did work well, so I have no regrets about using this to bind my stays.
I stitched the binding to the outside of my stays with a prick stitch (aka spaced back stitch), then folded it over and just whip stitched it down to the inside of my stays.
My quarantine, as prescribed by the health department, ended while I was binding these stays. So, I returned home with a pair of 3/4ths of the way bound stays. A far cry from the barely basted together pieces I'd left with nearly 3 weeks earlier!
The binding was prick stitched on to all the edges of the stays, and completely done, folded over and whip stitched down, on one half of the stays. The hard part was done, I had no excuse not to finish these things right away! Thus, within the next day or so I finished the binding, then that weekend I got around to the last little detail needed to make my new stays finished and wearable.
Eyelets to tie the straps in place!
On
my mid-18th century stays I did twill tape straps which were sewn on to the front, criss-crossed in the back, then wrapped around to hook in the front. I love how that style of straps worked out for that pair of stays! I was very tempted to do the same style of straps for this pair of stays, but I decided I wanted to try the more common sewn on in the back tied in the front type of straps instead. If I hated them, I could always cut them off and add twill tape later!
The straps were sewn onto the back of the stays during the main part of construction, right after all the stay panels were whip stitched together. (I actually sewed the straps on by machine because that was the quickest, easiest, option.) They were then bound with the rest of the stays, so the final thing they needed in order to be fully functional was a way to be attached to the front of the stays. Thus, the eyelets.
The four eyelets needed for the straps didn't take long to sew, but there was one little detail I decided to do first. At this point, my stays are not lined, but I'm keeping the option open to line them in the future if I so choose. To accommodate this possible future lining, I opted to do little facings just behind the strap eyelets. If and when I choose to fully line these stays in the future, I can line them right up to these small facings and not have to deal with somehow sewing the lining around the eyelets.
The facings are just small pieces of the first linen I could find in my scrap bag, cut to the right shape, edges folded in and whip stitched onto the stays. The first linen I could find in my scrap bag? It actually happened to be scraps from
this shirt I refashioned for my mom 5 years ago!
It was some how immensely satisfying to be able to use up just a little bit more of this shirt!
Facings on, final 4 eyelets sewn, the stays were done!!!! Yet. . . the ends of my lacing were all still wrapped in scotch tape. Now, several of my corsets do just have tape wrapped lacing ends and I've never bothered to do anything about it, but this time I decided to go the extra mile and properly finish all my lacing ends, all 8 of them, with thread.
Finishing my lacing ends with thread actually didn't take that long to do, and I feel like it was worth doing! That said, will I go back and do this on all my corset laces? LOL. No.
So, my 1780's stays are done!! All it took was 3 weeks and the Corona Virus to keep them from being abandoned in my sewing bag for who knows how long.
Gosh, I'm pleased with these things! I love the shape of them and have no complaints about the fit!
I thought the tied on straps might be annoying, but I wore my stays for a few hours one morning and they caused no issues.
I'm still kind of amazed that I actually got these things done! I knew I wanted to make them, but somehow corsets always get pushed down to the bottom of my to-do list until I actually need them.
Now that these are done I can begin making allllllll the 1780's things I've been gathering material for. . .
A Redingote, Chemise a la Reign, Piedmontese. . . Whatever shall I start with??
I'm using these fabulous stays as my submission for Historical Sew Monthly Challenge #9 of this year - Sewing Secrets. We're gonna call the zip tie boning a "secret". (Shhh! Don't tell anyone I'm too cheap and impatient to order actual synthetic whale bone!
What the item is: 1780's Stays
How it fits the challenge: These stays have 4 different "secrets" - First, I made them while I was quarantined with Covid-19. (Maybe this isn't actually a secret, but just a cool story. Either way. . .) Second, They're boned with zip ties since those are easier to come by than whale bone. Third, The linen scraps I used as lining behind the strap eyelets is harvested from a thrifted men's linen shirt I used for a refashion years ago. Fourth, There are two places (other than the boning channels) where I used my sewing machine on this project to save time - but you can't see where those places are!
Material: Heavy linen for interlining layers, lighter weight linen for the fashion layer.
Pattern: Augusta Stays by Scroop Patterns and Virgil's Fine Goods.
Year: 1775-1789
Notions: Hand quilting poly/cotton blend thread, silk button hole twist, linen lacing, zip ties, petersham ribbon, xantham gum to make buckram for interlining.
How historically accurate is it? 75% I'd say. The pattern is good, the shape is right, they are mostly hand sewn using period accurate techniques, and the main materials are decent. The main concessions to historical accuracy are: Plastic for boning since whale bone is a no-go. Using poly/cotton and silk thread rather than linen. Making the buckram with modern xanthan gum rather than the more accurate gum tragacanth. Machine sewing the majority of the boning channels and a couple other things (straps and edges). Binding with rayon petersham ribbon. And if we want to get really technical, the weave of my linen lacing probably isn't right.
Hours to complete: Who knows! About 3 weeks of relatively uninterrupted sewing time thanks to Covid.
First worn: For pictures September 10, 2020
Total cost: The pattern was about $16 on sale last fall. The zip ties were $2 a package, and I used about 2 packages. I paid $10 for a huge roll of petersham ribbon and used very little of it. The heavy linen was thrifted for $2 for 4 yards. I used maybe a yard. The bag of xanthan gum was about $10, and I have a ton left over. The hand quilting thread was $2 for the spool, and there's plenty of that left over too. Everything else was stash from several years ago so I don't remember costs. So that's about $54 that I spent to actually be able to do the project, but, including the pattern, there's only about $25 total worth of materials in the stays and all the left over materials will be used for future projects.


Very nice! :-)
ReplyDeleteGreat job! Glad you have recovered and doing well.
ReplyDeleteYou’re a star! What an achievement! I do hope you’re feeling better now.
ReplyDeleteFascinating and such a beautiful result!
ReplyDeletePretty! I love the pink, and they give a really nice shape. A great way to spend a not-so-fun time (glad you're recovered)!
ReplyDeleteWell, there's certainly a bit of history worked into those stays! They are lovely and I', glad you recovered well.
ReplyDeleteHaha! It is always satisfying to be justified for saving scraps. It was a clever solution.
If you are looking for a vote, I'd say a Redingote.