After months and months, nearly a year of work, procrastination, stops, and starts, my 1901, hot pink silk, fur trimmed, evening/dinner gown is at last, finally, really and truly, done!


If you would like a refresh on the project up to this point (It's been a long time since I started):
You can find my inspiration post here
The post about drafting the skirt pattern here
The post about actually making the skirt here
And the post about making the sleeves here
To go under the gown I also made a corset, bum pad, and princess petticoat.


In early June, I mocked up the pattern and adjusted it to have the shape I needed to go over an Edwardian S-bend corset, rather than a Victorian hour-glass corset. By the end of the day, I had a pattern all ready to go for my bodice lining!


In August, I made the sleeves, and blogged about those in detail here, then abandoned the project, as was my habit, for another month or so.


I began with the back of the bodice, as it seemed to be the least complicated. There was only one issue, I had no idea what the back of the original dress looked like! The only picture I had of the dress I was copying was the front, so I had to decided what I wanted the back of my dress to look like. I looked at lots and lots of pictures of other Edwardian evening gowns to get ideas.

That was easy enough, and before I knew it I was on to patterning the front overlay!

I figured for the bodice to drape the way it did, it must be cut on the bias. So, I cut a large square-ish piece of muslin on the bias, attached it to the shoulder and side seam of the bodice lining, basted the bodice front lining, with the large piece of muslin attached, to the bodice back, then put the bodice on over all my Edwardian undergarments.

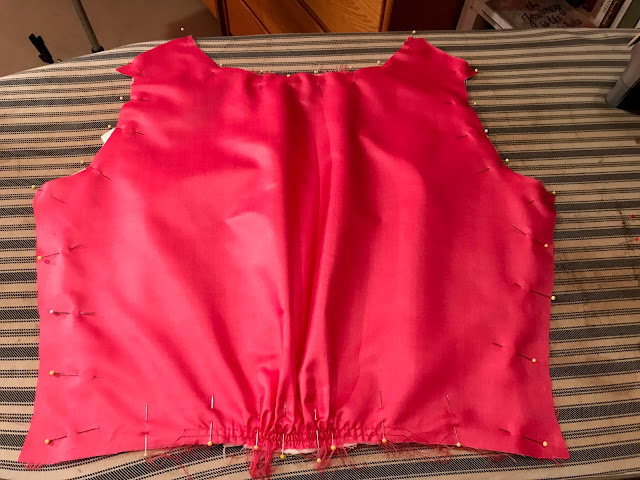
When we last looked at this project here, I had just finished the sleeves. Delicious confections of silk chiffon, silk organza, and lace, trimmed in fur and pink silk. But what were the sleeves to be attached to?

This. Well, this after some alterations and additions.
It should come as no surprise, given how long it's taken me to complete this project, that I came to a complete mental block on this dress a few times. After finishing the skirt, the next step was making the bodice lining to drape the rest of the bodice over. Honestly, making a bodice lining is not that hard, and I could have done it with patterns I already had, but I was overwhelmed and unmotivated thanks to COVID cancelling the event I was meant to wear this dress to. So I did nothing.
Late in the spring, Black Snail Patterns released an 1880's and 1890's evening gown bodice pattern. It was the basic shape I needed for my bodice lining. So, feeling motivated, I bought the pattern!


In late July, I finally made the bodice lining, out of a sturdy cotton twill.

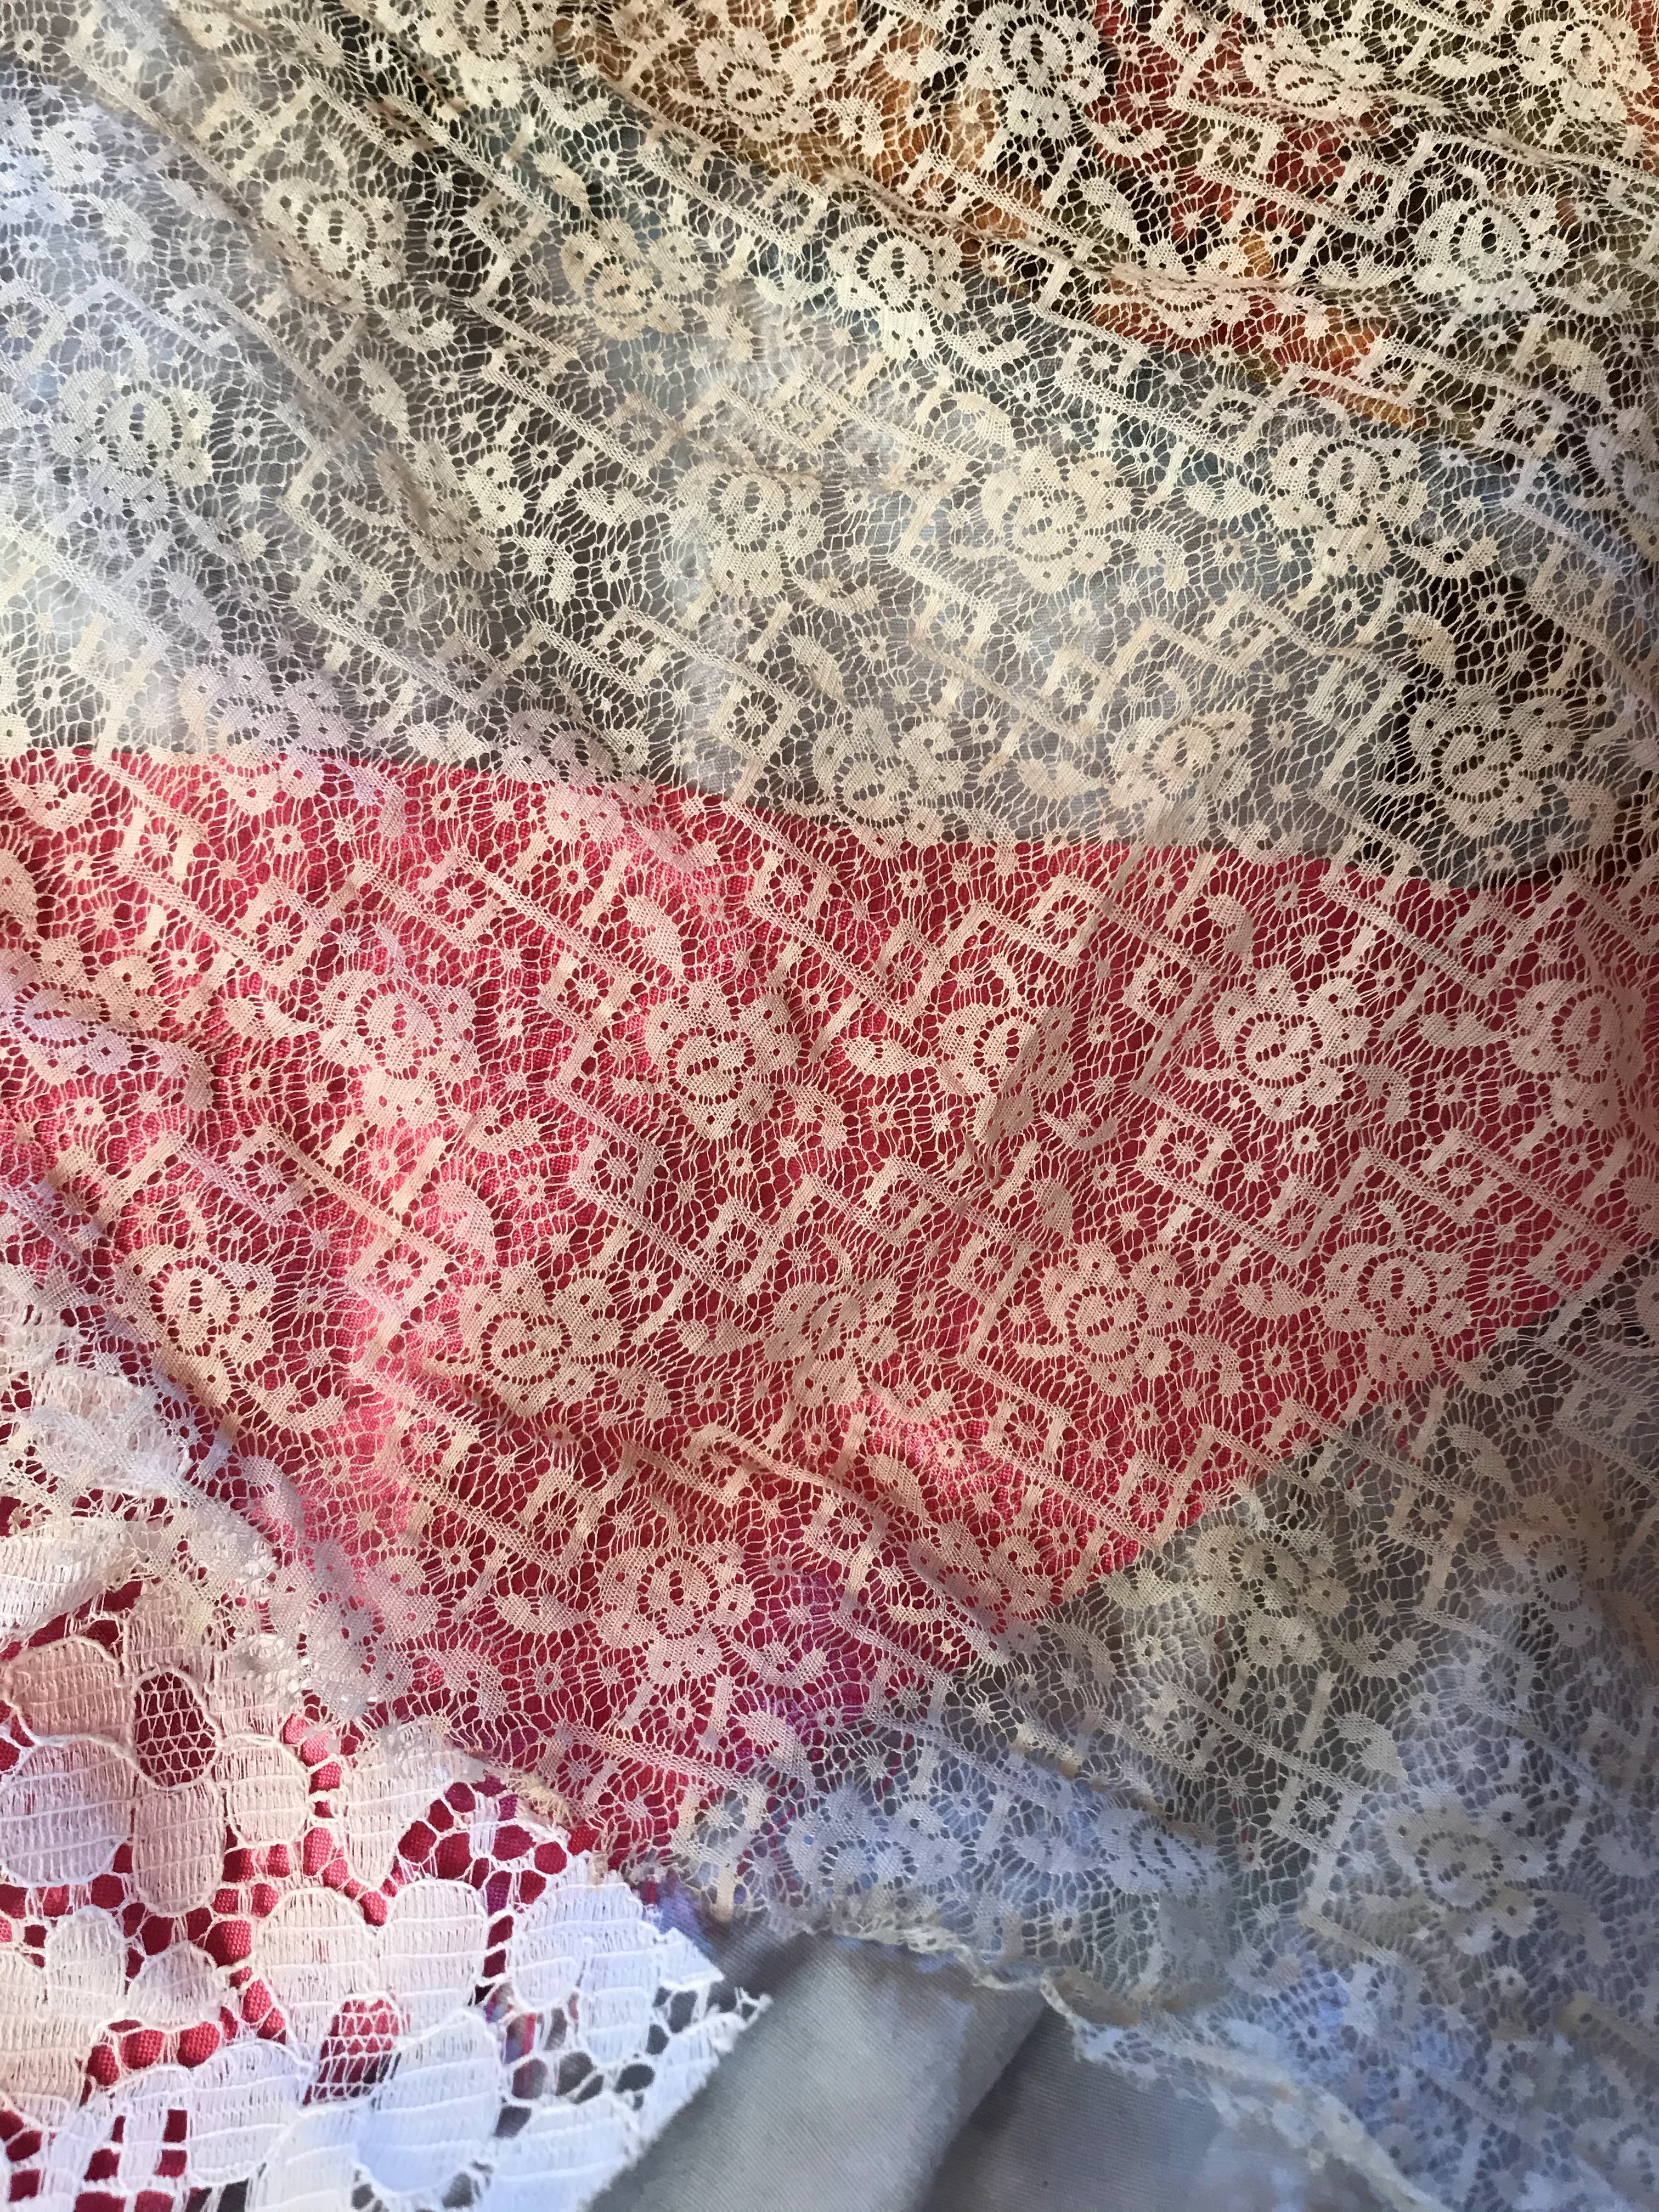
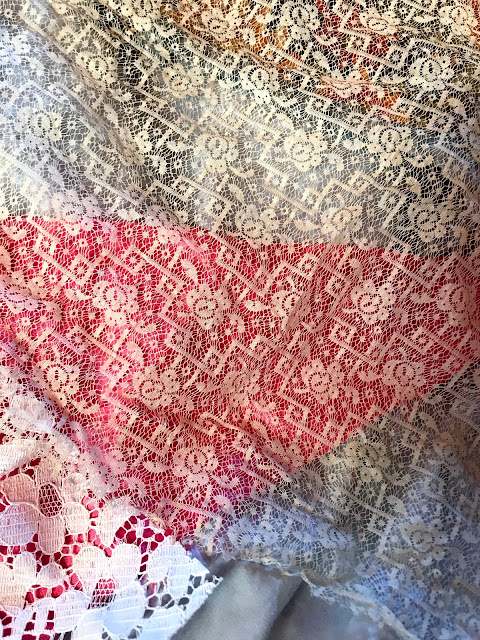
My next burst of motivation came in September when I found this lovely piece of vintage, or possibly even antique, lace in a bag of random old sewing stuff at my local antique mall. It was just the thing for the collar of my gown!

All excited about making the lace collar, I went ahead and finished up my bodice lining with boning channels and hooks and eyes down the center front opening.

Those little things done, it was time for both the most intimidating and exciting part of the entire bodice - draping and drafting the outer, pretty, layers of the bodice! In mid-November, after a few more interruptions and a fair bit more procrastinating, this began.

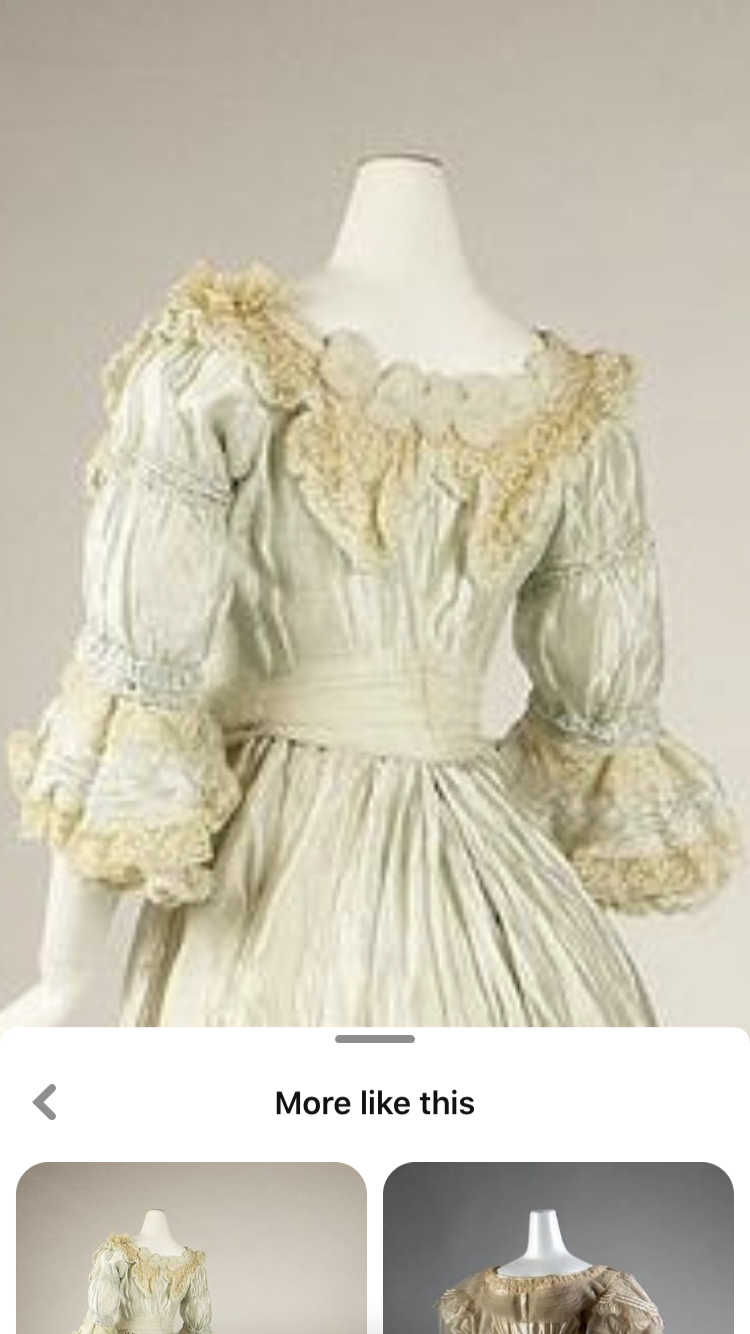
Eventually, I decided to base the back of my gown off of the back of the evening bodice of this gown held at the MET Museum.


I then used the bodice lining as a base to draft the back bodice overlay, cut it out of my pink silk, and attached it to my bodice lining, gathering the bottom edge to fit.


I'd determined the bodice must close by the two sides of the bodice crossing over at center front and fastening at the side seams with hooks and eyes.
 |
| Photo from Munich City Museum Evening Dress worn by Countess Courten, around 1901 |
I figured for the bodice to drape the way it did, it must be cut on the bias. So, I cut a large square-ish piece of muslin on the bias, attached it to the shoulder and side seam of the bodice lining, basted the bodice front lining, with the large piece of muslin attached, to the bodice back, then put the bodice on over all my Edwardian undergarments.

Wearing the bodice, I pulled the piece of muslin across my body, tugging, pleating, tucking, pinning, and drawing on important things like where I wanted my neckline to be.

I took the bodice off, cut away the excess fabric along my markings, then tried it back on to double check everything.

So far so good! Draping this bodice front hadn't been as complicated as I'd thought it would be! There was only one last thing I needed to pattern before I could cut the last few pieces out of my pink silk and finish this darned dress - the collar.

I marked the center front of my newly draped bodice, then traced the front and back neckline onto some scrap paper taped together.

I then drew the approximate shape my collar needed to be onto the paper, cut it out, and pinned it to the bodice.


Before I took the bodice off for the day, I measured the area at the front of the bodice, across the bust, which would be filled in with a piece of gathered silk chiffon on the final dress.

Once those dimensions were figured out, I could take the bodice off, remove all my basting, and cut my new pattern pieces out of silk.


The construction happened over the course of the next month, and I'll tell you all about it in my next blog post as this one is already quite long!
Wow! That turned out so good!
ReplyDeleteSo much brain work into this project and you pulled it off SO well!!!
ReplyDelete