It was the trim that drew me to the 1810’s dress I was using as my inspiration for my plaid Regency dress.

Rows of ruching around the neckline,
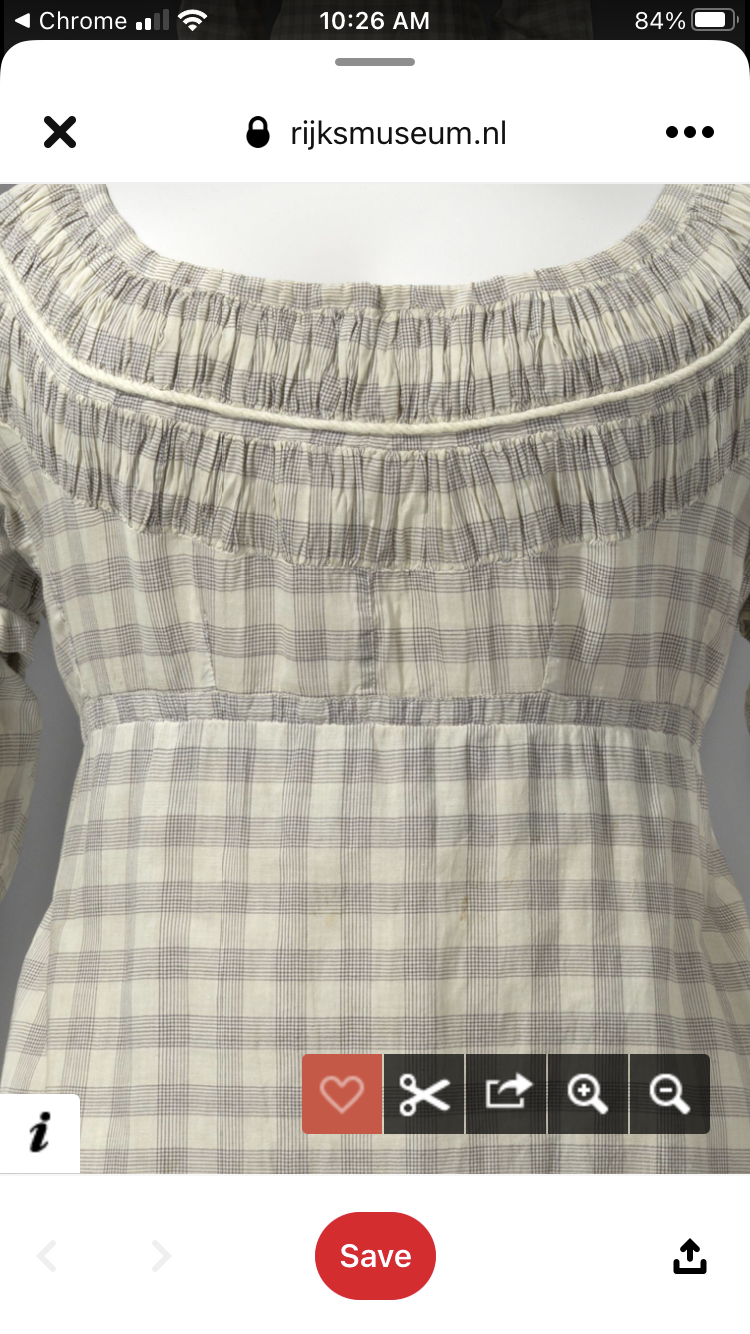


My goal was to re-create the neckline and the sleeve trim as close as possible, but for the skirt I decided to do more rows of ruching rather than the cording on the original.
With this decided, the next question was how would I edge the rows of ruching. On the original some edges were trimmed with cording and others were left plain. It looked like the ruching might actually be sewn into the bodice, rather than being applied on top of an already finished bodice the way I intended to do it.
After studying the pictures I had, thinking through my order of construction, and the materials I had a available to me already in stash, I decided to edge all the rows of ruching with ivory silk piping. Looking at pictures of other 1810’s dresses on Pinterest, this seemed to be a perfectly historically plausible trim choice.
Now how many rows of ruching would there be? I was making this dress for the Historical Sew Monthly “Ten” challenge since it was a dress from the 1810’s, so I decided to keep with the theme and do 10 rows of trim - 2 around the neckline, 2 on each sleeve, and 4 on the skirt. 2+2+2+4=10


And had the help of a kitty cat while doing so.

All the piping and some extra silk bias tape got wound up.

Next I figured out how many strips of wool I would need to make all the ruched bands. I cut those, pieces them together as needed, and in the interest of time, I sewed all my gathering stitches, down both edges of the wool strips, by machine.
The strips were pinned at the quarter points of the appropriate dress pieces, and gathered to fit.

This was easy on the bodice.

And the sleeve cuffs.


The cats helped with this as well.

Once all the rows were gathered down to size they were each hand basted onto the dress pieces - right down the middle, so the edges were free and ready to be piped.

On the bodice and the sleeve cuffs the piping was hand basted on.

Then the raw edges were flipped under and everything was hand sewn in place.

After I sewed on the first row of trim to the neckline, I took a break from trimming to finish the sleeves. I hemmed the short over sleeves and hand sewed a channel around a piece of cord to gather down the bottom edge.


I intended to hand sew on the skirt trim in the same manor - the end product looked really nice!
But it was the week of the fashion show.

And after hand sewing on part of one row of skirt trim I was forced to admit I wouldn’t have time to hand sew it all if I wanted to have a wearable, trimmed, dress for Saturday - remember the dress was still in pieces at this point. I intended to sew it together once the trim was all on.


Then flipped the edges under and used my zipper foot to “stitch in the ditch” and sew each row of ruching to the skirt.


Lending lots of moral support.

I sewed on all the trim on Wednesday, giving me Thursday and Friday evenings to assemble and finish the dress - would it be truly done by Saturday or would a be wearing a safety-pinned together gown to the Fashion show?

That was yet to be determined, but atleast the thing was trimmed!
Check back next weekend for the conclusion of the story!
Lots of work!! It does look lovely!
ReplyDeleteBeautiful! I've always admired that dress and that style in general. Piping is new to me but this gives me the courage to try it out some time! I can't wait to see the conclusion to the story. ;)
ReplyDelete-Erin
It looks great! All of the trim really elevates the finished dress.
ReplyDeleteBest,
Quinn