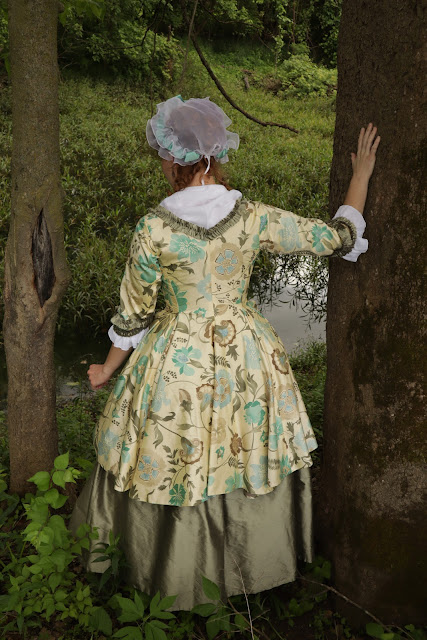
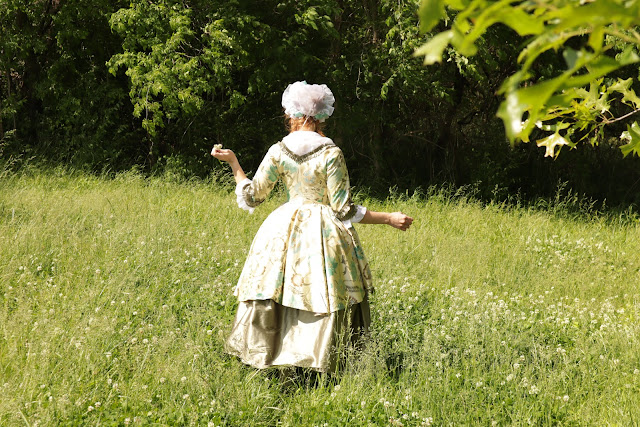
No, it's not my pink silk Edwardian evening gown. That project kind of stalled once the world went into lock down and my event was cancelled. (Last week I did finally cut out my bodice mock-up though, so progress is happening once more!) This was more of a "I really want to make this thing so I'm going to procrastinate all my other sewing projects and do it" project. Or, if you want to put a more positive spin on it a "Covid has changed everything so I'm going to cheer myself up by making this thing" project.
Last summer my friend Sara from the Saint Louis Historical Sewing Society sent me a 15% off coupon for her shop, Ensembles of the Past, for my birthday. I immediately decided to use this coupon on a pretty floral printed silk I'd been admiring in her shop for a while. I bought 4 yards, and then, while waiting for my fabric to arrive in the mail, I started looking through my costume books to figure out what I wanted to make with it.
By the time my fabric arrived a couple days later (Sara always ships super quick in my experience!) I'd decided exactly what I was going to make. The floral design just begged to be turned into something 18th century. After considering multiple options, I picked the 1775-1785 caraco on page 25 of Patterns of Fashion 1, by Janet Arnold.
Of course, like most of the historical ensembles I plan, this one did not get made right away. I bought this fabric last July and it sat in my stash until the first week of April. That week I decided, gosh darn, I was going to make this thing. Now.
I started by sizing up the gridded pattern out of the book. Honestly, I rather enjoy the process of drawing out gridded patterns and it always goes way faster than I expect it will!
Before long, I was cutting out my first mock-up from an old sheet! Directly out of the book, the pattern was already pretty close to my size. To make sure I'd have room for adjustments, I just cut my mock-up with nice wide seam allowances.
I was pleasantly surprised by how well the first mock-up fit! Yes, there were a few issues, but most weren't too hard to fix!
Narrow and slightly shorten the shoulder straps, raise the neckline, and try to get rid of the deep wrinkles at the waist. Those were all the issues I found with the front of the mock-up.
The back actually fit pretty darned well! Once I got the shoulder straps fitting well, only a few minor adjustments along the seams were required. Just let them out or take them in a touch to get a smooth fit - nothing complicated.
The hardest part of fitting this thing was figuring out what to do about those darned deep wrinkles in the front at the waistline.
I tried multiple ways of getting rid of this wrinkle on the mock-up with little success. Finally I just pinned the wrinkle out as a dart at the waistline, seam ripped that front panel off the mock-up, and took it back to my cutting table for some serious pattern alterations.
 |
| Waist dart pinned in place. |
I did not want a front waist seam/dart like this on my finished caraco. I wanted a solid one piece front like the caraco in the book. So I needed to figure out another way to remove the excess fullness from the waistline. I looked at extant caraco examples online to see how they were shaped. I looked at line drawings of caraco patterns to see where their seam lines were. I looked through all my historical costuming books with any 18th century clothing at all in them to see how caracos and similar garments were patterned. Surly there was a historically accurate way to pattern this thing without having deep wrinkles at the waist!
Finally, I found a solution! Diagram 23 (XXIII) in The Cut of Woman's Clothes by Norah Waugh is of an early 1780's Polonaise style jacket. This garment happens to be patterned very similarly to the early 1780's caraco I was making. The front panel is one solid piece, no waist seams or princess seams - the two things I was trying to avoid in my quest to remove the waist wrinkle on my caraco. Instead, the excess fabric at the waist was controlled by two darts running parallel to the side seam, which released into pleats at the waist where the skirt portion of the jacket began. I could totally add darts just like these to my caraco pattern!
To add these darts, I laid my front panel, with the big waistline dart pinned in place, out on my table. I laid it out as flat as I possibly could. It couldn't be laid completely flat because of the shaping the waist dart provided.
Next I added two slashes where I wanted the new darts to be. By opening these darts up, I was able to smooth the front panel out to be completely flat on my table. The excess material which I'd pinned out at the waistline was essentially moved into these new darts.
Once my new darts were opened up and the panel was laying completely flat, I traced it onto plastic to make my new pattern.
Then I put together another mock-up out of old sheets and tried it on for fit.
Still a little bit of wrinkling at the waistline, but much better! I messed around a bit with the length of my new darts to remove some of that wrinkling before deciding it was "good enough" and cutting into my pretty fabric. After a day spent patterning and mocking up, I was ready to actually make my caraco!
Right next to the pattern diagram for this garment in Patterns of Fashion 1, there are step-by-step directions explaining almost exactly how the original caraco was assembled. These are gold! I did my best to follow them in constructing my caraco.
Apparently the original is lined in a lightweight wool, not a linen as I would have expected. As I have way more wool in my stash than linen, I was not going to complain about this fact! I found a couple yards of lightweight tan wool in one of my wool boxes and cut out the lining from the same pattern I'd used for the silk outer layer.
According to the directions in the book, the silk and the wool layers of the caraco were constructed separately. The fully constructed wool lining was then placed inside the fully constructed silk outer layer, the edges of both were folded in, and the two were sewn together all around the edges, at the neckline, the hem, and the bottom of the sleeves.
To save time, I did the basic of construction of both the wool and silk layers with the sewing machine. Then I hand sewed the two layers together.
Once the wool and silk were sewn together, I situated the waistline pleats and then stabilized them with cotton twill tape. The pleats on the original were stabilized with either wool or linen tape, but cotton is what I had on hand, so cotton is what I used.
Once the silk and wool were all stitched together and the back pleats were stabilized, on it went for the first fitting! And it was a bit too small. . .
Thankfully I'd left a nice wide seam allowance folded in along the center front so it wasn't hard to let it out a bit, and then my caraco fit beautifully!
It was time for the finishing touches! Along the front opening I sewed hooks and eyes, as that's how the original fastened according to Patterns of Fashion 1.
I chose to stagger my hooks and eyes - hook, eye, hook, eye, hook, eye - down each side as this gives a more secure closure than having all the hooks on one side and all the eyes on the other.
Once the hooks and eyes were sewn in place, it was on with the trim! I made pinked trim from the same silk as the petticoat I would be wearing the caraco with.
It's a sage green silk shantung from Fabric Mart, and not particularly well suited to pinking. It's a little too loosely woven.
 |
| Far right sample is cut parallel to the selvage, others are cut across the width of the material. |
That said, I had it in my mind I wanted pinked trim, so I was going to have pinked trim. After a few tests, I determined the pinking worked best if my strips of trim were cut parallel to the selvage, rather than across the width of the fabric from selvage to selvage. So, that's how I cut it!
After cutting a bunch of strips of silk just over 1" wide, I lightly gathered them, then sewed my trim in place all around the neckline, front opening, and sleeve hems.
Applying the trim took about a week of hand sewing in between other projects.
And then it was done!
I was so excited when I finished sewing on the trim that the very next day I put on my stays and petticoat, did my hair up in something resembling a 1780's style (More on that when I blog about my cap and other millinery later.), donned my newly completed caraco, and practically begged my brother to come outside and take pictures of the new ensemble.
He graciously agreed!
We took full advantage of the peonies blooming in the yard then wandered down the lane to take pictures at the creek.
Along the way I found a patch of clover, which was just too pretty not to sit in!
And dance in.
Once I was done being distracted by the clover, the creek did indeed yield the fabulous photos I'd hoped it would.
I greatly, greatly, appreciate my brother's willingness to follow me all over our property with a camera.
I am ridiculously pleased with how this caraco turned out!
And when all is said and done, it was actually a relatively quick project.
The patterning and mocking up took one day, the basic construction, by machine, took the next.
The hand finishing then took an entire month, but I was working on many different projects during that time, and kept getting distracted and forgetting about this one for a week at a time here and there.
If I'd just stayed focused on this one project, I most likely could have had all the hand sewing done in a week.
But it's not how fast you finish a project that matters, it's how much you like the finished result.
And I have no complaints there!


wow. I feel like there is a costume clothing institution somewhere that should award you an honorary doctorate! Do you have a future teaching these skills to others? Do you make costumes for others? You are amazingly smart and hard working.
ReplyDeleteLooks great! And your photos are lovely! There are too many beautiful backgrounds to choose a favorite. Looking forward to hearing about your accessories, as well.
ReplyDeleteBest,
Quinn
Oh, my. This is just amazing. What a gorgeous costume. The ruffled trim really makes it look very true to that time. Great job Alyssa
ReplyDeleteAlternating hooks and eyes- totally stealing that!!!
ReplyDeleteThanks for showing your scale up process.
The ensemble is fabulous!!
Oh my, why did I not read this post earlier??!! I made this exact same caraco pattern this spring, and had those exact same wrinkles around the waist. It's good to see I wasn't the only one! I wasn't able to entirely get rid of them, but I tied a ribbon around my waist and all was good. ;) Thanks for this!
ReplyDelete-Erin