A regency era dress. Something from the era of Jane Austen. A gown to make me look like I belong in the same room as the Bennett sisters. That's what I've wanted to make for at least the past year, but I keep putting it off.
Why? The undergarments. Before I could make a regency dress I needed to make regency stays, and for some reason those have not been at the top of my to-do list. I love to sew dresses, but corsets and stays,ugghh! all the mock-ups and fittings that must go into a properly fitting corset. It's a little tedious and I have a hard time convincing myself to make more than one a year. (Strangely though, once I finish a corset I really want to make another. After about a month however, nope, not happening.)
Then Historical Sew Monthly's 2016 challenge schedule came out. January's Challenge, procrastination. Finish a garment you've been putting off. Perfect! I was going to make my regency stays happen!

I decided I wanted front lacing short stays, so that I could easily get in and out of them on my own. Back lacing long stays, I figured, would be quite a bit harder to get in and out of on my own. So I found this tutorial on how to draft your own short stays pattern and got to work.

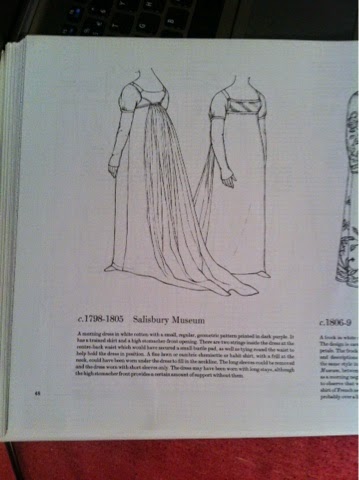
Drafting the front of the stays according to my measurements went pretty quick, then came the back, my measurements didn't work with how she said to draft the back (thanks to my wide shoulders). I decided to look at pictures of original regency short stays to get an idea of how the back was supposed to look, so that I could finish my pattern. Well, I couldn't find any original front lacing short stays that resembled those I was wanting to make. Uh-oh, are front lacing short stays really accurate at all? I can't say for sure, but it did make me re-consider what sort of regency corset/stays I wanted to make. This regency wrap corset really intrigued me.

It looked easy to get in and out of, and appeared to give plenty of bust support (the goal of this era being to lift the bust line to make those empire waist gowns flattering). I decided I wanted to make a similar wrap corset, but where did I start? How did I make a pattern for this? Or where could I find one (preferably for free). Well a few google searches offered me this treasure. This blogger, Sabine, had gotten her hands on this regency wrap corset.

Then she had recreated it! And put the pattern on her blog to be downloaded by costumers who wanted to do the same! After reading her blog post I printed out the pattern, sized it to fit me, and got to work. The first mock-up was done in less than an hour. The only adjustment I had to make was to the bust gussets. (If you choose to use this pattern you make your own gusset pattern, so I used the gusset I'd drafted for the short stays I'd decided against making. This way my work on that pattern didn't entirely go to waste!) I ripped out the gussets, made a couple adjustments, then sewed them back in. The mock-up then fit perfectly and gave me the appropriate regency silhouette.

Yes! Now I could get started on the real thing. I used two layers of a cotton/linen blend fabric, lots of twill tape for binding, linen lacing, and a cut-off paint stick for a busk. No boning was needed. (The busk supports the fabric so that the bust is held up. Boning was too flimsy to do this for me.)

My wrap corset is entirely hand sewn, not entirely by conscious choice. I knew I would need to hand sew the binding (that took for-ev-er) and I wanted to try my hand at hand working eyelets, but the basic construction I fully intended to do by machine. However, the weekend I got started on this, I wasn't home at all. So, not wanting to put this off now that I had finally started it, I took the corset, a pincushion, and thread everywhere with me. Four days later, it was done!

What the item is: A regency wrap corset
The Challenge: Procrastination, I've put off making this for about a year
Materials: Cotton/linen blend fabric
Pattern: http://kleidungum1800.blogspot.de/2014/05/short-stays-studies-schnurleib-studien.html
Year: 1800-1820
Notions: cotton thread, linen lacing, paint stick, lots and lots of twill tape
How historically accurate is it? Well it's all hand sewn, cotton and linen were both used for corsets at the time, but I'm not sure on the accuracy of a blend fabric. Also I constructed it in a manor that made sense in my mind, rather than researching it, so at least 80%.
Hours to complete: About 10-12, at least 8 of that was sewing on the binding
First worn: Not yet, just for pictures
Total cost: about $10

Now this style of corset would have mostly just been worn for traveling (it's very comfortable) and very informal wear. Not all the time for everything, but as it gives me the correct silhouette, I will wear it with any regency outfit I make, until I for some reason decide to make another corset. I'm very excited to have this corset done and have started the mock-up for my regency dress!

I can't wait to have a complete regency ensemble!
Amazing work! I realise this is an old post but I'm just wondering how this fastens. Is there a hole on one side for one half of the wraparound to go through or is it one slightly under the other?
ReplyDeleteOne is slightly under the other. The second to last picture above shows this decently well :)
DeleteThat's great! Thanks for clarifying. I was just having trouble visualising it for some reason!
Deletethank you!! I really need to get on drafting my own short stays and this will help when I inevitably have questions
ReplyDelete